In the previous guide, we added products to the Chec Dashboard and listed them out in a React application.
Now it's time to create a shopping cart so your customers can buy multiple products at once. One of the biggest advantages of using the Commerce.js SDK, is that the commerce object has easy to implement functions that help you to build out the cart functionality. Further and most importantly, every cart method such as cart.add(), cart.retrieve(), cart.update(), returning an updated cart object which helps keep your cart updated and persistent through a refresh. Now, let's dive in!
** Note **
- This guide is using v2 of the SDK
- The Live Demo is best viewed on Desktop (responsiveness limited)

This guide will cover:
- Setting up variants and handling that in code
- The process to add a product to your cart
- Making sure to give cart update notification to user
- Listing items that have been added to cart
- Adding a button to empty entire cart
- Capability to increase/decrease quantity from within cart
This guide strictly utilizes functional react components and relies heavenly on React Hooks. The purpose of this guide is to show how you can use the SDK to build eCommerce functionality and not a true deep dive into React. There will be links to outside resources that can further explain certain React features.
Requirements/Prerequisites
- IDE of your choice (code editor)
- NodeJS, or yarn → npm or yarn.
- Some knowledge of Javascript & React
- Bonus - Using React Hooks - specifically
useState(),useEffect(),useContext() - Bonus - familiarity with the framework Semantic UI (react) library
Getting Started
STEP 1. Adding Variants:
This step is important when having products with some sort of variance. If you have a product without variances, you can proceed to Step 2. — otherwise you will need to add product variances in your Chec Dashboard. In this example store selling t-shirts, most likely you'll have different sizes and colors. To keep it simple let's provide one variant and three options of Small, Medium, Large. Once you click on a product, select the options tab ...

It's important to note that you shouldn't add a price in this section unless a particular variant yields an increase in price. So in this case no matter which size you select, the price remains $25. Save those changes and let's see how to handle this in your code!
Handling Variants in the code
The Product object has a property variants which is an array with each product variant. Also within each variant is another property options which is also an array with each variant options (ex. Small, Medium etc...)
You can handle this data in your <ProductCard /> component where you are currently displaying product info. You can display the options how you like, but for this example, use a drop-down. Because of how drop-downs are configured with Semantic UI - you will have to provide an options array of objects with a certain format.
// *** ProductCard.js ***

    useEffect(() => {

        let finalSizeArray = props.product.variants[0].options.map(option => {
            let sizeInfo = {}

            sizeInfo.key = option.name
            sizeInfo.text = option.name
            sizeInfo.value = option.id

            return sizeInfo
        })

        setSizes(finalSizeArray)
    }, [])
The purpose of the useEffect() here is that the <Dropdown /> Semantic UI component needs options to select. The useEffect() allows you to map through the variant options and create your options array before the render. It's important to note that here, the value to the option.id has been set because that is data needed to add a product (and it's variant) to the cart. Once complete, add that value to state so our <Dropdown /> component can access it.
const [sizes, setSizes] = useState([])
This is how your Product Card should look once the dropdown has been added:
// *** ProductCard.js ***

<Card>
    <Image src={props.product.media.source} />
    <Card.Content>
        <Card.Header>{props.product.name}</Card.Header>
        <Card.Meta>{props.product.price.formatted_with_symbol}</Card.Meta>
        <Card.Description>{props.product.description.replace(/(<([^>]+)>)/ig,"")}</Card.Description>
        <Dropdown
            className="sizes-drop"
            onChange={handleSize}
            value={sizes.text}
            fluid
            placeholder='Select Size'
            selection
            options={sizes}
        />
    </Card.Content>
</Card>
Now it's time to write the onChange function handleSize() that will capture the selection and put that data into state:
// *** ProductCard.js ***

const [variantInfo, setVariantInfo] = useState()

const handleSize = (e, {value}) => {
    setVariantInfo({[props.product.variants[0].id]: value})
}
This function creates an object that matches the proper format for sending variant info using the cart.add() method from the SDK.
{ vrnt_RyWOwmPO9lnEa2: 'optn_zkK6oLpvEoXn0Q' }
You now have an object variable (variantInfo) that contains the variantID along with the selected variant optionID.
STEP 2. Addding Product to Cart:
This is where the fun begins! Just a point of note, you're going to see a pattern emerge where you add an action button - write a function to handle said action, then pass that function to the component that needs it. But before you do any of that, you first need to setup the state that will be holding your cart object for the entire app.
// *** App.js ***

const [cart, setCart] = useState()
There are many ways to handle state management, which also includes organization. For this example put your 'global state' (state that needs accessed across many components) inside the <App /> component. For shallow nested components you will prop drill - for the deeply nested components you should use the useContext() API.
Let's now write the addToCart() function that will take two args - a productId and the variantInfo variable mentioned earlier:
// *** App.js ***

const addToCart = (productId, variantInfo) => {

    if(variantInfo) {
        commerce.cart.add(productId, 1, variantInfo)
            .then(res => {
                setCart(res.cart)
            })
    } else {
        window.alert('Please Select a Shirt Size')
    }
}
There is some logic to make sure the user selects a variant (it's required to select a variant in order to add it to the cart). Note that the quantity has been hard-code to 1 because the cart page is where a customer can change the quantity. Lastly, upon a successful response you'll want to add the cart object to the global cart state.
Utilization of cart.retrieve()
This is a very important method because when called, it returns your most up to date cart data. You want to use this method in our <App /> component to always be checking for the latest cart data. As you will see, this also helps with data persistence in the event of a refresh or re-render.
// *** App.js ***

useEffect(() => {
    commerce.cart.retrieve()
        .then(res => {
            setCart(res)
        })
},[])
Let's take a look at the <App /> component with all the updates:
// *** App.js ***

function App() {

    const commerce = new Commerce(process.env.REACT_APP_PUBLICKEY_SANDBOX)

    const [cart, setCart] = useState()

    useEffect(() => {
        commerce.cart.retrieve()
            .then(res => {
                setCart(res)
            })
    },[])

    const addToCart = (productId, variantInfo) => {

        if(variantInfo) {
            commerce.cart.add(productId, 1, variantInfo)
                .then(res => {
                    setCart(res.cart)
                })
        } else {
            window.alert('Please Select a Shirt Size')
        }
    }

    return (
        <div className="App">
            <Nav cart={cart} emptyCart={emptyCart}/>
            <Grid centered stackable padded relaxed>
                <Grid.Column className='left-column' width={5}>
                    <LeftPanel />
                </Grid.Column>
                <Grid.Column width={9}>
                    <ProductContainer
                        addToCart={addToCart}
                    />
                </Grid.Column>
            </Grid>
            <Footer />
        </div>
  );
}
You have cart.retrieve() always making sure your cart object is up to date, your addToCart() function that is being passed to your <ProductContainer /> component - which will then be passed to your <ProductCard /> component.
Add to Cart Button
Now that you have everything setup in your <App /> and have also passed the addToCart() function to the proper component - you will need to create a button that will trigger the function and add the product (and its variant) to the cart, and also update your state cart object.
// *** ProductCard.js ***

const handleButtonAddCart = e => {
    e.preventDefault()
    props.addToCart(props.product.id, variantInfo)
}

<Button fluid className='add-button' onClick={handleButtonAddCart}>
    Add to Cart
    <Icon name='arrow right' />
</Button>
You'll notice when calling the addToCart() function with the two required args, which then runs and executes, this lets you know that a product has been added to the cart!

STEP 3. Add Cart Notification:
Once you've added an item/product to the cart, you need to let the customer know something has been added to the cart. This can be done in many ways: you can give a message, pop up a modal etc... For this example, change the cart Icon from the normal black color to a green color with a number associated with the amount of items in the cart.
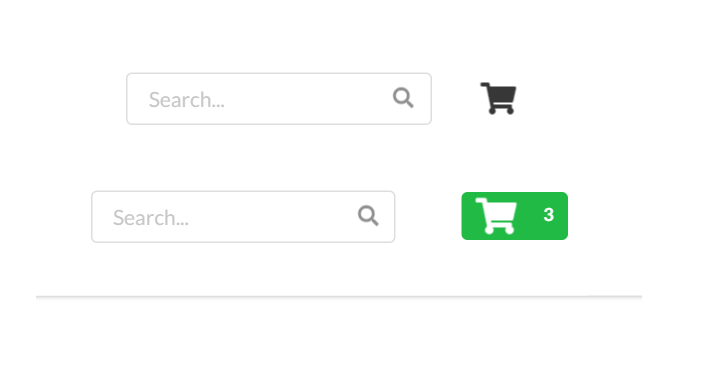
Display for Empty Cart
When the cart is empty as mentioned you only want to show the black cart icon, and when you click the cart you want to show an empty cart. For this example your cart page will be a modal. Once clicked a modal will pop up saying the cart is empty.
This is accomplished by sending your cart object from state to your <Nav /> component.
// *** App.js ***

<Nav cart={cart} emptyCart={emptyCart}/>
The cart object has all the necessary data required to display what's needed to the customer. And, if you recall because you are updating the cart object in state whenever there are changes, you can attach key data to the cart object and ensure that the cart information is correct.
Here's a look at the cart object with key data points underlined ...

One of the best benefits of the Commerce.js SDK is that you can tie the total_unique_items property to the cart icon to either show a number or the plain black cart.
// *** Nav.js ***

const iconDisplay = () => {

    if (props.cart && props.cart.total_unique_items > 0) {
        return(
            <Label color='green' >
                <Icon name='shopping cart' size='big'/>
                {props.cart.total_unique_items}
            </Label>
        )
    } else {
        return (
            <Icon name='shopping cart' size='large'/>
        )
    }
}
There is a function here that returns some JSX depending on the value of props.cart.total_unique_items. Semantic UI (React) has a <Modal /> component that you will use to display our cart modal. There's a trigger attribute that takes a JSX element that when clicked will pop up the modal. Now, just pass your iconDisplay() function to the trigger.
// *** Nav.js ***

<Modal trigger={iconDisplay()} className='cart-model' closeIcon>
    <CartModal cart={props.cart} />
</Modal>
As you can see, this passes the cart object as a prop to the <CartModal /> component that will be used later to display any items/products that are in the cart. In your <CartModal /> component, there will be more logic based on the value of props.cart.total_unique_items.
It's important to distinct between total_items and total_unique_items, we only care about the **unique*** items because those are the items that get displayed.*
Let's take a look at your <CartModal /> component and setup what will get displayed if the total_unique_items is zero:
// *** CartModal.js ***

{props.cart && props.cart.total_unique_items > 0 ? (
    <>
        //This is what we will display if there are any items/products
        //in our cart
    </>
)
:
(
    // This is our Modal when there are ZERO items/products in our cart

    <>
        <Modal.Header>Seities Apparel Cart</Modal.Header>
        <Modal.Content image>
            <Image wrapped size='huge' src={cartImg} />
            <Modal.Description>
                <Header>Your Cart is currently Empty</Header>
                <p>
                    It would make you very happy if you added an item to the cart
                </p>
            </Modal.Description>
        </Modal.Content>
    </>
)}

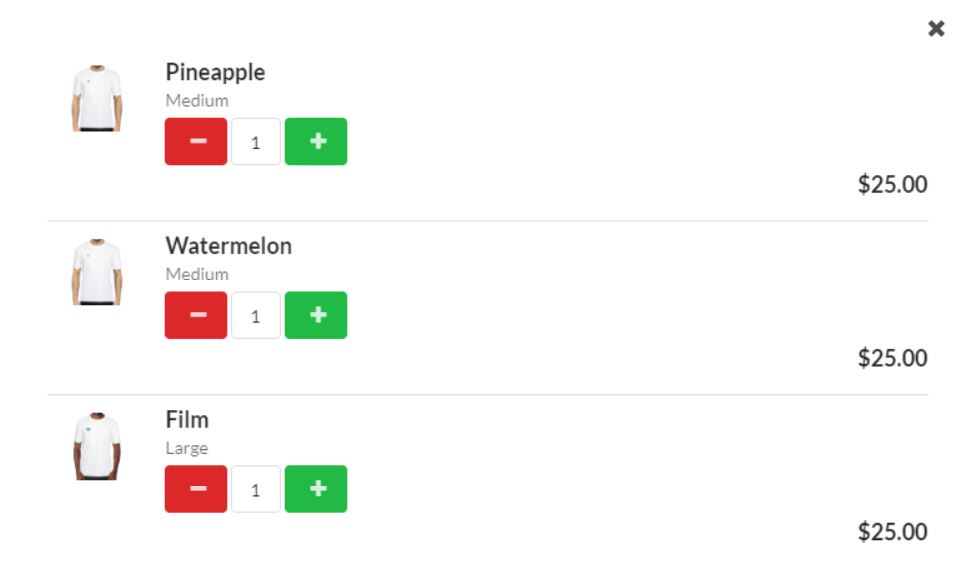
STEP 4. Listing Items/Products in Cart:
Now it's time to add code so that you can display any items/products in the cart. Create another component <CartItems /> that will be used to render your data. If you recall, you've been passing your cart object in state - but for THESE items, you only need data about each item. The Commerce.js SDK wonderfully provides all necessary data within the line_items property. Take a look:
In order to make sure you're listing all items in the cart, you need to map over the line_items property and send each item down to your <CartItems /> component.
// *** CartModal.js ***

{props.cart && props.cart.total_unique_items > 0 ? (
    <>
        <Item.Group divided>
            {props.cart.line_items.map(item => (
                <Item key={item.id}>
                    <CartItems item={item}/>
                </Item>
            ))}
        </Item.Group>
    </>
)
Now that you have gone a level deeper in the cart object (line_items) - within your <CartItems /> component you can now access data associated with each item.

Let's take a look at your <CartItems /> component and see how you're displaying and rendering item information:
return (
    // *** CartItems.js ***

    <>
        <Item.Image size='tiny' src={props.item.media.source} />
        <Item.Content verticalAlign='middle'>
            <Item.Header>{props.item.name}</Item.Header>
            <Item.Meta>
                <span>{props.item.variants[0].option_name}</span>
            </Item.Meta>
            <Item.Extra className='item-total'>
                <Header floated='right'>${props.item.line_total.formatted_with_symbol}</Header>
            </Item.Extra>
        </Item.Content>
    </>
);
As you can see we're just grabbing the necessary data from the props object that correlates to traditional data you would see when looking at shopping cart on an eCommerce website.
STEP 5. Add Empty Cart Button:
Now that you have the cart logic complete and rendering products, add a button that will be used to empty the entire cart! For this, reference the pattern:
add an action button - write a function to handle said action, then pass that function to the component that needs it
Add Action Button
The customer only needs to empty the cart if there are items present - so only add the button where you are mapping over the line_items property.
// *** CartModal.js ***

{props.cart && props.cart.total_unique_items > 0 ? (
    <>
        <Item.Group divided>
            {props.cart.line_items.map(item => (
                <Item key={item.id}>
                    <CartItems item={item}/>
                </Item>
            ))}
        </Item.Group>

        <Modal.Actions className='model-bottom'>
            <Button
                basic
                negative
                floated='left'
            >
                Empty Cart
            </Button>
            <Header floated='right'>{props.cart.subtotal.formatted_with_symbol}</Header>
        </Modal.Actions>
    </>
)
Function to handle action (empty cart)
Now, write your function in the same place where your cart object in state is located, which in this example is in the <App /> component. Because this is a shallow nest, send your function via props to the <CartModal /> component.
// *** App.js ***

const emptyCart = () => {
    commerce.cart.empty()
        .then(res => {
            setCart(null)
        })
}

//Passing function as prop App -> Nav
<Nav cart={cart} emptyCart={emptyCart} />
// *** Nav.js *** Passing function as prop App -> Nav -> CartModal
<CartModal cart={props.cart} emptyCart={props.emptyCart} />
// *** CartModal.js *** Adding function to handle click
<Button
    basic
    negative
    floated='left'
    onClick={props.emptyCart}
>
Above is why you want this function to live in the component where your cart object in state was created. It makes it simple and easy to update state whenever there are any changes to the cart. And because your state cart object is being shared across components - any updates to the cart triggers a re-render. This way your cart object is always up to date and your UI is connected to the data within the cart object.
- You will notice we're setting the cart object to
null. Based on how your logic is setup this could be an empty array[]orundefinedect... - this will be up to you and how you might set things up. Because yourcomponent is retrieving a new cart each render or refresh, nullwill be overwritten.

STEP 6. Add Functionality to Increase/Decrease Quanity:
Lastly, it's time to add the capability to increase/descrease the item quanity. This is important to allow customers to adjust quanity before the checkout. Again, let's reference the pattern once more!
add an action button - write a function to handle said action, then pass that function to the component that needs it
Let's add the necessary buttons ...
Buttons will be added in your <CartItems /> component. There are many ways to present this feature, but for this example, let's use three elements:
- Minus button
- Input
- Add button
    // *** CartItems.js ***

return (
    <>
        <Item.Image size='tiny' src={props.item.media.source} />
        <Item.Content verticalAlign='middle'>
            <Item.Header>{props.item.name}</Item.Header>
            <Item.Meta>
                <span>{props.item.variants[0].option_name}</span>
            </Item.Meta>

            // New Added Elements
            <div className='quanity-group'>
                <Button
                    negative
                    className='quan-buttons'
                >
                    <Icon name='minus' />
                </Button>
                <Input
                    className='input-quanity'
                    value={props.item.quantity}
                />
                <Button
                    positive
                    className='quan-buttons'
                >
                    <Icon name='plus' />
                </Button>
            </div>
            <Item.Extra className='item-total'>
                <Header floated='right'>${props.item.line_total.formatted_with_symbol}</Header>
            </Item.Extra>
        </Item.Content>
    </>
);
Hardcoding the initial quanity, brings that value from props and sets it as an input value.
// *** CartItems.js ***

<Input
    className='input-quanity'
    value={props.item.quantity}
/>
Another important addition is the line_total which correlates to the total amount based on quanity.
// *** CartItems.js ***

<Item.Extra className='item-total'>
    <Header floated='right'>${props.item.line_total.formatted_with_symbol}</Header>
</Item.Extra>
Here's a look at the cart once the new elements have been added:
Creating Functions for each action
Now that you have the quantity buttons displaying properly, write the functions utilizing the Commerce.js SDK cart methods. As mentioned you'll want to write these functions in the <App /> component where the cart object in state lives.
// *** App.js ***

const cartHelperFunctions = {

    deleteItem: (lineItemId) => {
        commerce.cart.remove(lineItemId)
            .then(res => {
                setCart(res.cart)
            })
    },
    addQaunity: (lineItemId, newQuanity) => {
        commerce.cart.update(lineItemId, {quantity: newQuanity})
            .then(res => {
                setCart(res.cart)

            })
    },
    subtractQuanity: (lineItemId, newQuanity) => {

        if (newQuanity === 0) {
            cartHelperFunctions.deleteItem(lineItemId)
        } else {
            commerce.cart.update(lineItemId, {quantity: newQuanity})
                .then(res => {
                    setCart(res.cart)
                })
        }

    }
}
Since all these functions are being sent to the same component <CartItems />, create an object that will reference each function based on a particular key. Because of the Commerce.js SDK and the properties on the cart object, you have everything you need to call these SDK cart methods.
You also have some extra logic in your subtractQuanity() function that checks if a customer clicks the minus button to get to a quanity of zero. In this case, you'll want to completely remove the item from the cart. This will allow you to just call the deleteItem() function along with the lineItemId.
Passing down our functions...
Because the <CartItems /> component is deeply nested, use a particular hook to help prevent massive prop drilling - useContext().
Again, this is preference and NOT a guide on React hooks or prop drilling...
Moving forward, in order to use Context API - you'll need to setup your context and export it using createContext():
export const CartItemsContext = React.createContext()
Once created you can wrap the context provider component around the component that will need the functions. This provider component takes a value attribute that will be set to the data needed within the component tree.
The cool thing about the Context API is that whatever component is wrapped in the provider will have access to the value attribute - it acts as a broadcast to every nested component.
// *** App.js **

<CartItemsContext.Provider value={cartHelperFunctions}>
    <Nav cart={cart} emptyCart={emptyCart}/>
</CartItemsContext.Provider>
As you can see, you're passing the cartHelperFunctions object as a value.
Now in your <CartItems /> component (which is deeply nested, access your functions by first importing your context and second, using the useContext() hook and initializing it with your context.
// *** CartItems.js ***

import { CartItemsContext } from '../App'

const helpFnc = useContext(CartItemsContext)
All you need to do now is attach the proper function to an onClick for each button. Further, because your data is being read from the cart object in state and the cart object is being updated with each action - your data will always reflect the correct information, how awesome is that!
// *** CartItems.js ***

<div className='quanity-group'>
    <Button
        negative
        className='quan-buttons'
        onClick={() => {
            let newQuanity = props.item.quantity - 1
            helpFnc.subtractQuanity(props.item.id, newQuanity)
        }}
    >
        <Icon name='minus' />
    </Button>
    <Input
        className='input-quanity'
        value={props.item.quantity}
    />
    <Button
        positive
        className='quan-buttons'
        onClick={() => {
            let newQuanity = props.item.quantity + 1
            helpFnc.addQaunity(props.item.id, newQuanity)
        }}
    >
        <Icon name='plus' />
    </Button>
</div>
You can calcuate the newQaunity and pass that data along with the item.id.
Once complete you should have full cart functionality!

Conclusion
Wheew! Let's take a step back and quickly summarize what you accomplished in this guide.
- used the Chec Dashboard to add variants to products
- setup global cart object and wrote function to add product to cart
- made sure visually the customer can be assured an item was added to the cart
- mapped over line items and listed the products in the cart
- wrote function to empty cart and added button
- wrote functions to increase/decrease quanity and added buttons
Thanks to the Commerce.js SDK and all the useful methods/functions that come with the commerce object - updating/refreshing/adding to your cart becomes straightforward and easy to manage. You setup your global state for the cart and pass that data throughout your app.
If you happen to be advanced in React you can implement Redux for state managment and initialize your store with the cart object. There are many ways to design and layout your eCommerce app - but the most important factor is getting the neccessary data in order to provide a smooth user experience when selecting a product and adding it to the cart.
This guide is a continuation of a previous guide: Check that out if you're just starting out and need help with getting your products listed on the page.
Live demo for this Guide: "Adding products to Cart"
Live demo for entire integration (storefront > cart > checkout)
Built With
React.Js Semantic-UI Commerce.js (SDK)
If you're ready for the next step - check out the next guide ->