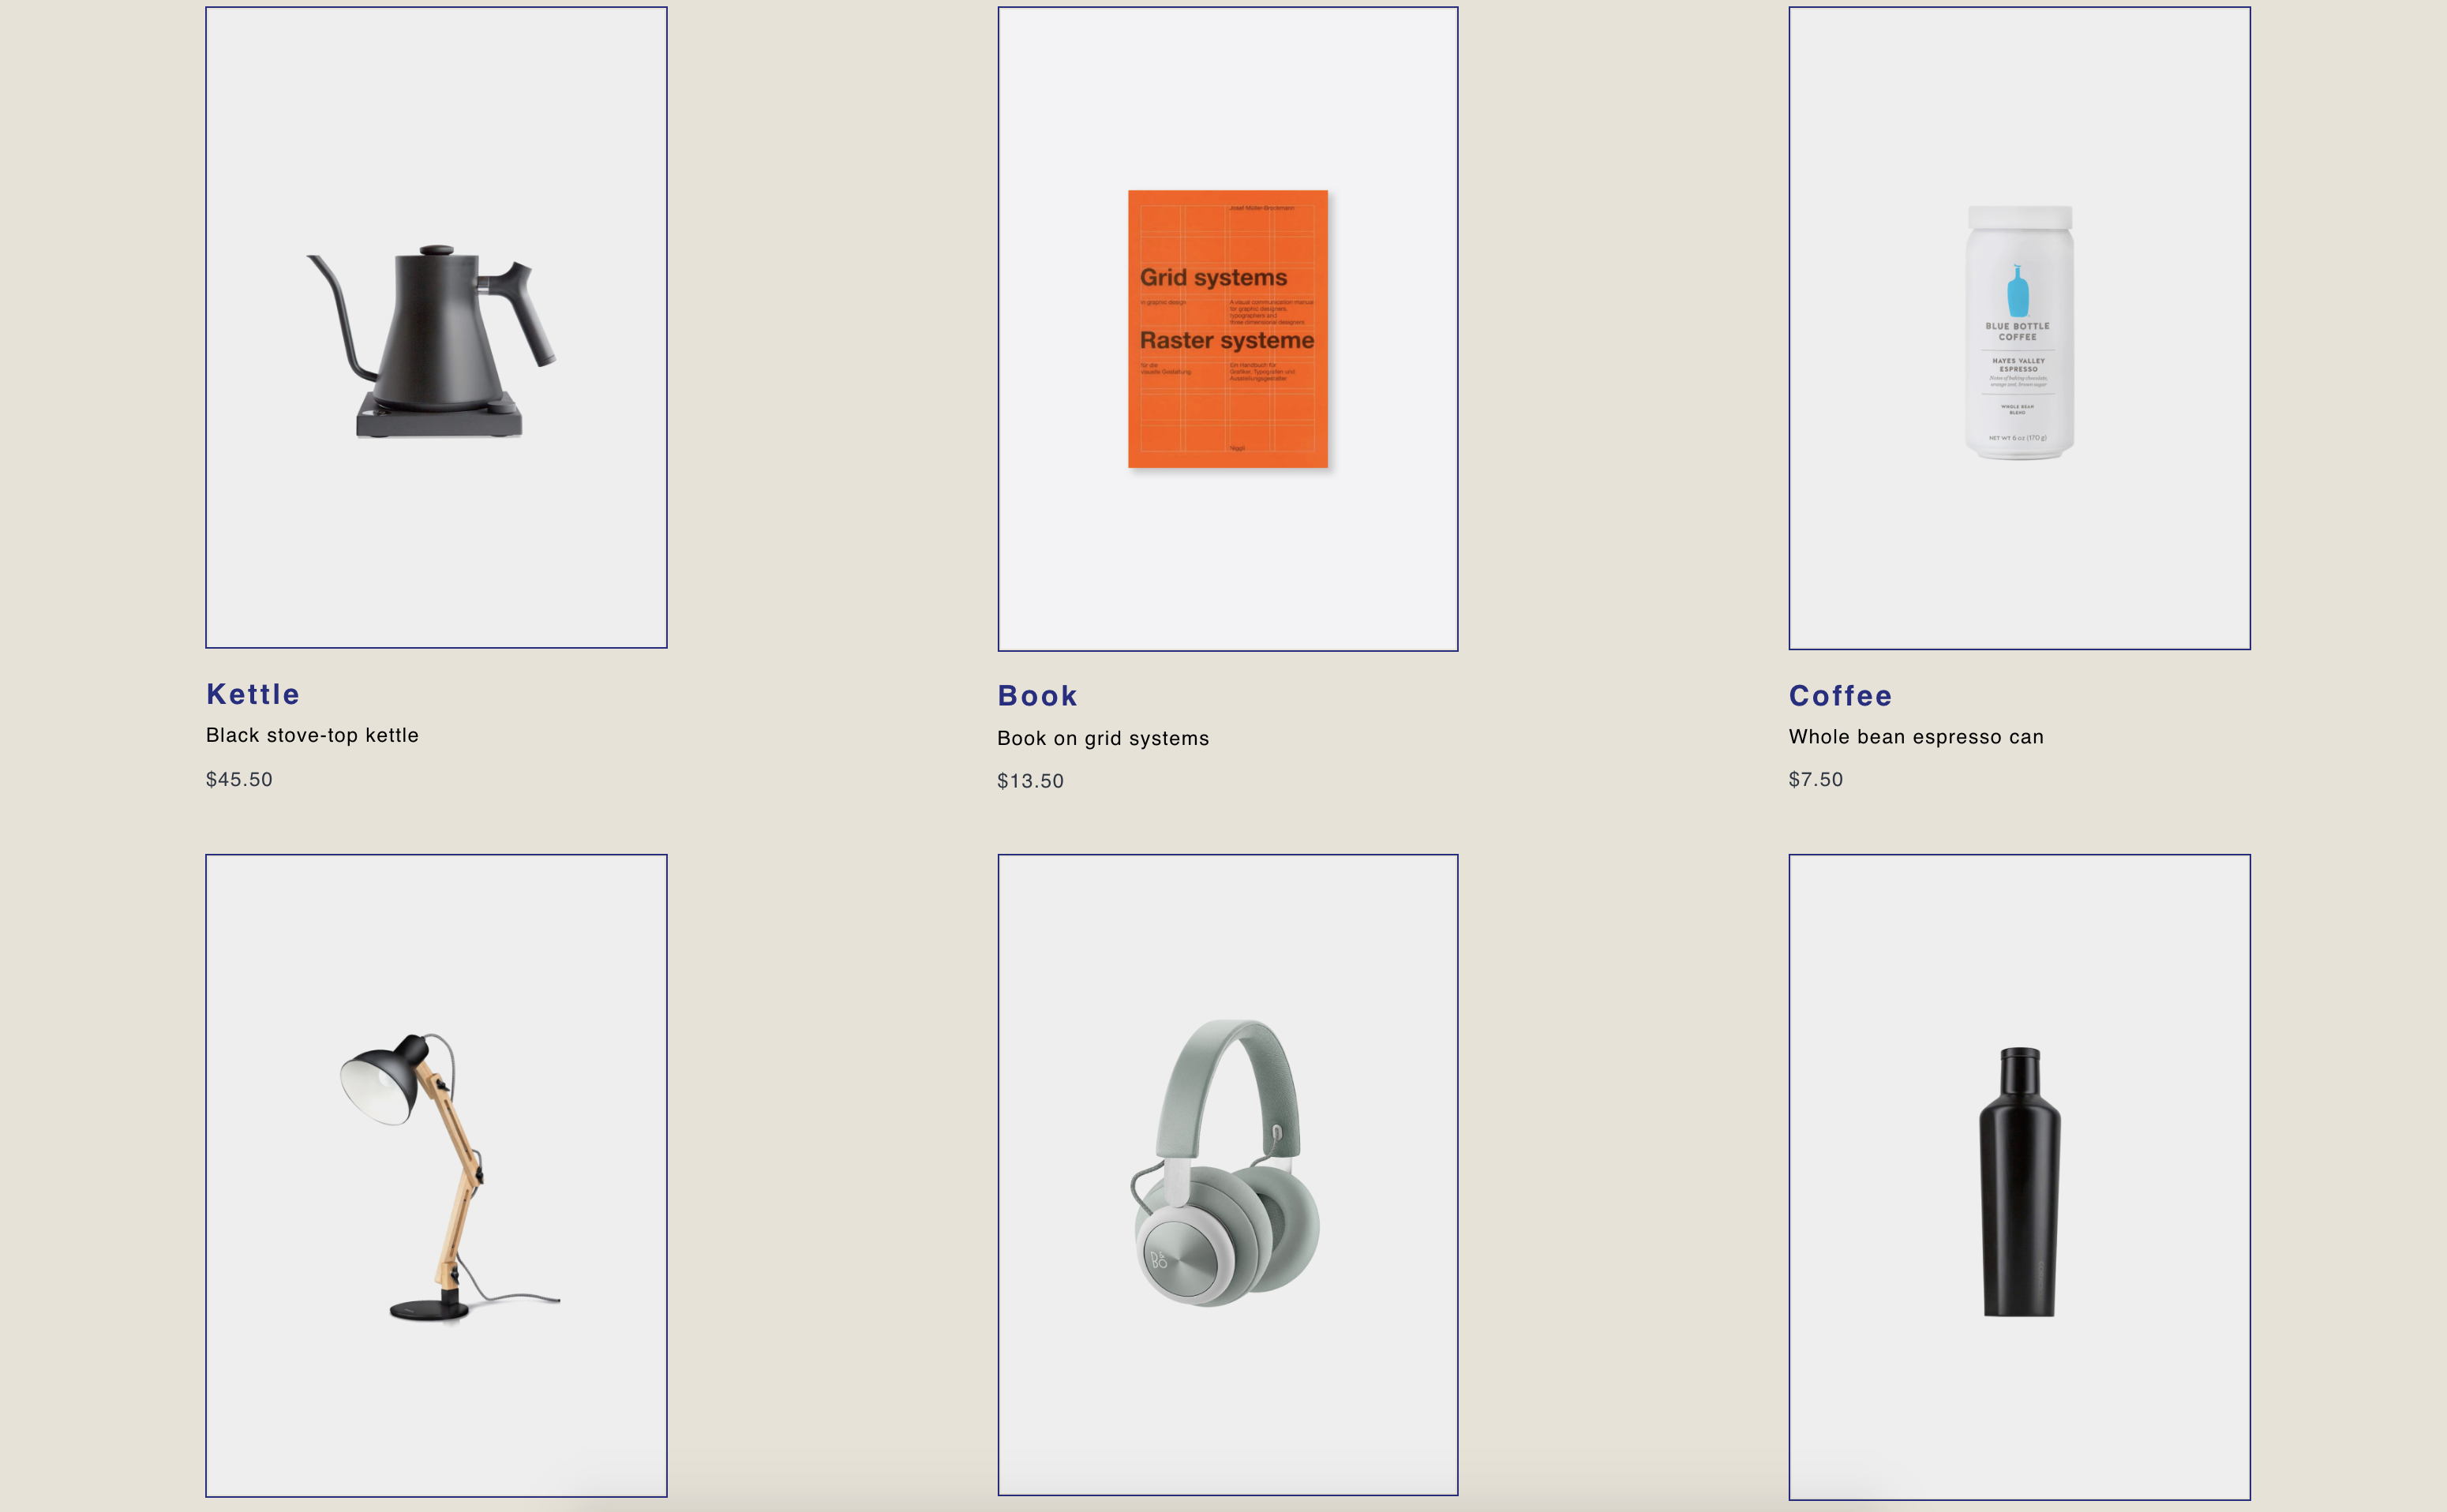
Overview - Listing products
In this 3 part guide, you will learn how to build an eCommerce application in Vue.js using Commerce.js. In part 1, you will learn how to:
- Set up a Vue project
- Install Commerce.js
- Create a products listing page
Skip to guides:
Requirements
What you will need to start this project:
- An IDE or code editor
- NodeJS, at least v8
- npm or yarn
- Vue.js devtools (recommended)
Prerequisites
This guide assumes you have some knowledge of the below concepts before starting:
- Basic knowledge of JavaScript
- Some knowledge of Vue.js
- An idea of the JAMstack architecture and how APIs work
Some things to note:
- We will only cover high level concepts of Vue.js.
- To ensure you have some product data to work with for this guide, we will provide you with a demo merchant public key.
- We will not be going over account or dashboard setup. Have a read here if you'd like to learn more about setting up an account.
- This application is using the CSS utility framework TailwindCSS. Because the main goal of this guide is to learn how to list products with Commerce.js, we will not be going over any styling details.
Initial setup
1. Install and set up Vue.js
To quickly create a Vue.js project, install the Vue CLI globally in your terminal:
yarn add -g @vue/cli
# OR
npm install -g @vue/cli
To create a new project, run:
vue create your-project-name
Change directory into your project folder:
cd your-project-name
2. Store the public key in an environment variable file
Create a .env to store the public key.
touch .env
Open up your the .env file and input in the environment variable key and value:
# Public key from Chec's demo merchant account
VUE_APP_CHEC_PUBLIC_KEY=pk_184625ed86f36703d7d233bcf6d519a4f9398f20048ec
3. Start your local HTTP server and run your development environment:
yarn serve
# OR
npm run serve
Add Commerce.js to the application
1. Install Commerce.js
To communicate with the Chec API and fetch data from the commerce backend, you first need to install the Commerce.js SDK. The Commerce.js SDK can be installed via CDN by including <script type="text/javascript" src="https://cdn.chec.io/v2/commerce.js"></script> in your index.html file, or installed with a package manager
(recommended):
yarn add @chec/commerce.js
# OR
npm install @chec/commerce.js
2. Create a Commerce.js instance
To access the chec/commerce.js library that you just installed, you need to create a new instance so it can be used throughout your application. Open your main.js file and add the following:
// Import the Commerce object
import Commerce from '@chec/commerce.js';

// Create a new Commerce instance
const commerce = (typeof process.env.VUE_APP_CHEC_PUBLIC_KEY !== 'undefined')
  ? new Commerce(process.env.VUE_APP_CHEC_PUBLIC_KEY)
  : null;
You have now successfully imported the Commerce object and created a new Commerce.js instance by passing in and processing our environment variable VUE_APP_CHEC_PUBLIC_KEY as an argument. This ternary condition first checks whether a public key is available as an environment variable, and if it does, you can create our new Commerce instance and store it in a variable called commerce.
You might want to throw an error if the public key isn't available, since it will probably make your application unusable.
3. Inject commerce as a global plugin
In order to have access to your commerce instance you created earlier, inject 'this' as a global property. This means that any of your Vue components can access the Commerce object via this.$commerce.
Vue.mixin({
  beforeCreate() {
    this.$commerce = commerce;
  },
});
You have now successfully assigned a Vue property in the beforeCreate() lifecycle hook. This hook will be called immediately after the Vue instance initializes, creating the this.$commerce instance variable. This hook
will be called before any local component's lifecycle hooks, making this.$commerce available to be consumed throughout our application's components.
Build application
Now that the initial setup is done and you have made the commerce object available to be used throughout your application, let's build the products listing page.
1. Fetch product data
One of the main resources in Chec is the Products endpoint. Commerce.js makes it seamless to fetch product data with its promise-based
method commerce.products.list(). This request calls the GET v1/products API endpoint and returns a list of product data upon a successful call. Let's open up the App.js file and make our first Commerce.js request.
First, you'll want to delete the code that came with creating a new Vue app and write this file from scratch. Keep the template, and script tags intact.
<template>
</template>

<script>
export default {
  name: 'app',
};
</script>
Before making your first call to list products, you need to declare products as an empty array in your app component's initial state so you can store the returned product data. Underneath the name property, use the data function to declare products in state:
data() {
  return {
    products: [],
  }
},
You are now ready to make your first Commerce.js request. Create a function called fetchProducts() in the methods property and make a request to the products endpoint using commerce.products.list() Commerce.js method.
methods: {
  /**
   * Fetch products data from Chec and store in the products data object.
   * https://commercejs.com/docs/sdk/products
   */
  fetchProducts() {
    this.$commerce.products.list().then((products) => {
      this.products = products.data;
    }).catch((error) => {
      console.log('There is an error fetching products', error);
    });
  },
},
Inside the curly braces, access this.$commerce and use the "products" resource's list() method. Upon a successful call to the Chec API products endpoint, store products.data in your state (this.products).
Creating the function does not do anything as you are yet to call this function. When the app component mounts to the DOM, use the lifecycle created() hook to call the fetchProducts() function which will then return your product data.
created() {
  this.fetchProducts();
},
Now either go to your Vue.js devtools to see the returned data or in your network tab in the browser, you should be able to first see in headers that the request was successful with a 200 status code. The products data JSON object under the preview tab should also have an abbreviated returned data object like the below:
[
  {
    "id": "prod_NqKE50BR4wdgBL",
    "created": 1594075580,
    "last_updated": 1599691862,
    "active": true,
    "permalink": "TSUTww",
    "name": "Kettle",
    "description": "<p>Black stove-top kettle</p>",
    "price": {
      "raw": 45.5,
      "formatted": "45.50",
      "formatted_with_symbol": "$45.50",
      "formatted_with_code": "45.50 USD"
    },
    "quantity": 0,
    "media": {
      "type": "image",
      "source": "https://cdn.chec.io/merchants/18462/images/676785cedc85f69ab27c42c307af5dec30120ab75f03a9889ab29|u9 1.png"
    },
    "sku": null,
    "meta": null,
    "conditionals": {
      "is_active": true,
      "is_free": false,
      "is_tax_exempt": false,
      "is_pay_what_you_want": false,
      "is_quantity_limited": false,
      "is_sold_out": false,
      "has_digital_delivery": false,
      "has_physical_delivery": false,
      "has_images": true,
      "has_video": false,
      "has_rich_embed": false,
      "collects_fullname": false,
      "collects_shipping_address": false,
      "collects_billing_address": false,
      "collects_extrafields": false
    },
    "is": {
      "active": true,
      "free": false,
      "tax_exempt": false,
      "pay_what_you_want": false,
      "quantity_limited": false,
      "sold_out": false
    },
    "has": {
      "digital_delivery": false,
      "physical_delivery": false,
      "images": true,
      "video": false,
      "rich_embed": false
    },
    "collects": {
      "fullname": false,
      "shipping_address": false,
      "billing_address": false,
      "extrafields": false
    },
    "checkout_url": {
      "checkout": "https://checkout.chec.io/TSUTww?checkout=true",
      "display": "https://checkout.chec.io/TSUTww"
    },
    "extrafields": [],
    "variants": [],
    "categories": [
      {
        "id": "cat_3zkK6oLvVlXn0Q",
        "slug": "office",
        "name": "Home office"
      }
    ],
    "assets": [
      {
        "id": "ast_7ZAMo1Mp7oNJ4x",
        "url": "https://cdn.chec.io/merchants/18462/images/676785cedc85f69ab27c42c307af5dec30120ab75f03a9889ab29|u9 1.png",
        "is_image": true,
        "data": [],
        "meta": [],
        "created_at": 1594075541,
        "merchant_id": 18462
      }
    ]
  },
]
With the product data object now available, you can use it to render your templates.
2. Create our product item component
Due to the nature of Vue and most modern JavaScript frameworks, components are a way to encapsulate a group of elements to reuse as custom components throughout your application. Create two components for your products, one for a single product item and another for the list of product items.
In src/components, create a new file and name it ProductItem.vue. Name your component and define a product prop in the script tag:
<script>
export default {
  name: 'ProductItem',
  props: ['product'],
};
</script>
You have now defined a product prop. Later you can pass it as a property to the ProductItem component. Props are custom attributes you can register on a component. Values that later get passed into prop attributes become a
property of that component instance. It is essentially a variable that will be defined by whatever the parent component sends down - this may also be bound dynamically to something like Vuex, so it updates everywhere automatically.
Now render out the data that was provided by your product data object. In ProductItem.vue, use the template element to render the product image, name, description, and price.
<template>
  <div class="product__card">
    <img class="product__image" :src="product.media.source" >
    <h3 class="product__name">{{ product.name }}</h3>
    <p class="product__description" v-html="product.description"></p>
    <p class="product__price">{{ product.price.formatted_with_symbol }}</p>
  </div>
</template>
As you saw earlier in the abbreviated JSON, the returned product data object comes with all the information required to build a product listing view. In the code snippet above, use the product prop to access the various
properties. First, render an image tag with the src value of product.media.source. The semicolon is shorthand for the v-binddirective which will dynamically bind the value ofproduct.media.srcto thesrcHTML attribute - the product's image URL. This is followed byproduct.name, product.descriptionandproduct.price.formatted_with_symbol`.
All these elements follow the same pattern of accessing the available data from the product prop. One thing to note is the description tag: the description property is HTML. The built-in v-html is a Vue directive
which will help to output the description as real HTML instead of the returned plain text string with paragraph and other HTML tags included. If you don't want to do this, you can also strip the HTML tags and render it as plain text.
3. Create product list component
With your single product item component now created, you can now go ahead and create a product list component which will loop through and render a list of product items.
Once again in src/components, create another file and name it ProductsList.vue. Inside the script tag, import in the ProductItem component and register it in the components of our component.
<script>
import ProductItem from './ProductItem';

export default {
  name: 'ProductsList',
  components: {
    ProductItem,
  },
};
</script>
Next, define a products prop in order to accept the product data passed down from your App parent component. You will also need to do a type check and prop validation by defining the default value as an array.
props: {
  products: {
    type: Array,
    default: () => [],
  },
},
With your ProductItem component imported and registered, you can loop through each product item and render a "product item" from within the template:
<template>
  <div class="products">
    <ProductItem
      v-for="product in products"
      :key="product.id"
      :product="product"
      class="products__item"
    />
  </div>
</template>
Use the v-for directive on the ProductItem component to loop through the products array and render that component for each product.
With both your product item and list components created and abstracted away, now render them in your App component. Import the ProductsList after the opening script tag and register it in the components property.
<script>
import ProductsList from './components/ProductsList';

export default {
  name: 'app',
  components: {
    ProductsList,
  },
  data() {
    return {
      products: [],
    }
  },
  created() {
    this.fetchProducts();
  },
  methods: {
    /**
     * Fetch products data from Chec and stores in the products data object.
     * https://commercejs.com/docs/sdk/products
     */
    fetchProducts() {
      this.$commerce.products.list().then((products) => {
        this.products = products.data;
      }).catch((error) => {
        console.log('There is an error fetching products', error);
      });
    },
  },
};
</script>
Lastly in your template tags, render the ProductsList component and pass in the products prop with returned product data as the value.
<template>
  <ProductsList :products="products" />
</template>
That wraps it up!
Awesome, you've just completed creating a products listing page using Commerce.js and Vue.js! This guide is the first part in a full Vue.js series. The next guide will walk you through on how to add cart functionalities to your application.
To view the final code up until this point go here.