This guide continues from Listing products in a catalogue with Nuxt.js and Commerce.js.
Overview
This guide will illustrate on how to create and add products to a cart using Nuxt.js.
If you followed the previous guide, you created a Nuxt application using create-nuxt-app, where you also created a Nuxt plugin for the Commerce.js SDK, and used that plugin to get your products and render them server-side by using the nuxtServerInit action. This guide is going to build off of the previous one and demonstrate how to use the following cart methods; cart.add(), cart.retrieve(), cart.remove(), and cart.empty(). To do this you will be expanding on your Vuex store and utilizing Vuetify to build out a simple UI that visually demonstrates these methods.
Note: This guide uses v2 of the Commerce.js SDK
This guide will cover
- Creating variants of a product in your Chec Dashboard (Optional)
- Adding and removing products from a cart
- Listing cart items and clearing a cart
Requirements
- IDE of your choice: VS Code is not required, you can use something lightweight like Atom Code Editor or Sublime Text.
- Commerce.js SDK
- Yarn or npm
- Nuxt.js
- Vuetify
- Vuex
Prerequisites
Basic knowldge of Nuxt.js and JavaScript are required for this guide, and some familiarity with Vuetify would help.
- Nuxt.js v2
- JavaScript(ES7)
- Vuetify.js v2.2.15
- Vue.js
Getting started
Product Variants (optional)
This step is optional but can be useful if you haven't gotten a chance to dive deeply into your dashboard yet. A variant in this context, would be a product that you offer that may have multiple options for purchase. A variant is a combination of variant options. For example; If you were selling a shirt, and the shirt came in various 'sizes' or 'colors', 'size' and 'color' would be considered variant groups and 'red', 'blue' would be variant options under the variant group 'color'. Variants can be generated or created out of variant options. For example, 'small, red shirt' would be considered a variant. Your Chec dashboard makes that easily available for you to add and customize.

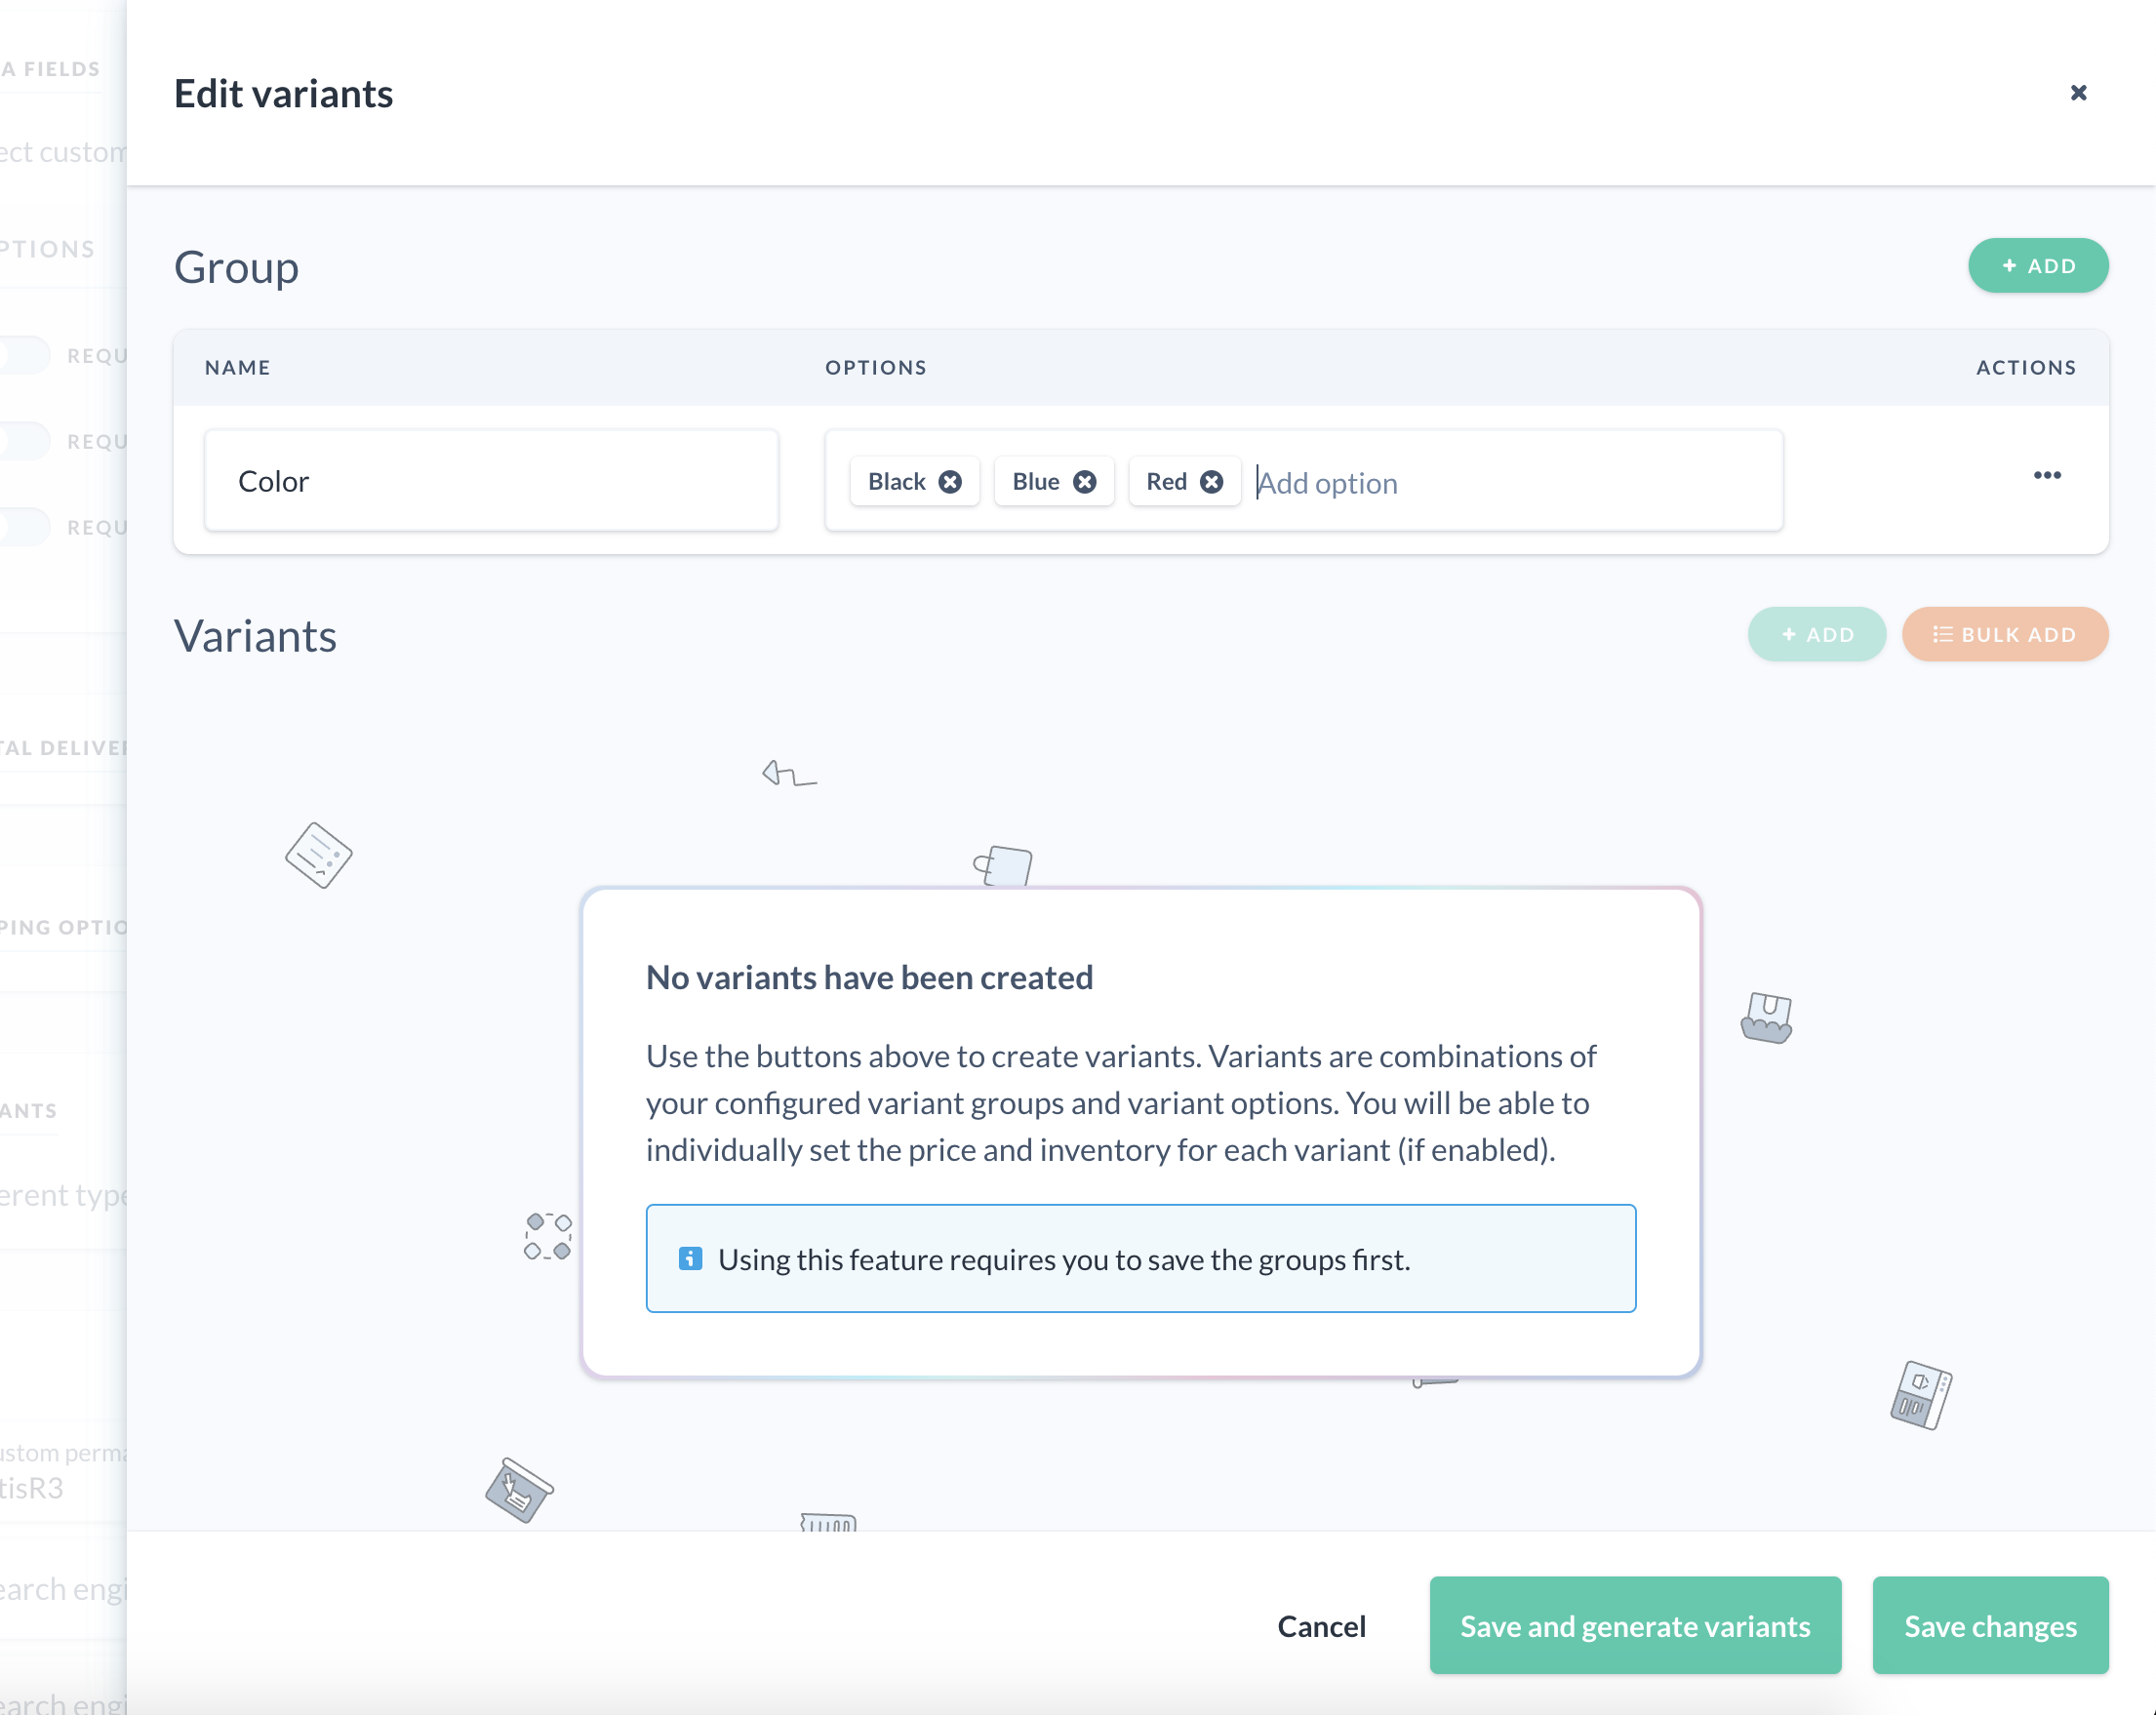
For more information, refer to how to add variants to your products in the dashboard.
Variant groups, variant options and variants
The variant_groups property at the products endpoint is an array that contains a list of variant options options. You will find the variants data at the product variants endpoint /products/{product_id}/variants. Each variant is a combination of variant options available in your Chec dashboard. For more information on how to add variants and/or variant groups and options, refer to adding to cart.
Example abbreviated data of listing variant group and variant option:
{
  "data": [
    {
      "id": "vgrp_8XO3wpMPWoYAzQ",
      "name": "Size",
      "options": [
        {
          "id": "optn_RyWOwmnKAonEa2",
          "name": "Small",
          "price": {
            "raw": 0,
            "formatted": "0.00",
            "formatted_with_symbol": "$0.00",
            "formatted_with_code": "0.00 USD"
          },
        },
      ]
    }
  ]
}
Example abbreviated data of retrieving a specific variant:
{
  "id": "vrnt_dKvg9l6vl1bB76",
  "sku": "ABC-123-XYZ",
  "inventory": 75,
  "price": {
    "raw": 19.95,
    "formatted": "19.95",
    "formatted_with_symbol": "$19.95",
    "formatted_with_code": "19.95 USD"
  },
  "meta": null,
  "description": "Small red T-shirt",
  "options": {
    "vgrp_bWZ3l83Ke5kpEQ": "optn_VPvL5z6O95AQkX",
    "vgrp_QG375vPzLwrMOg": "optn_9BAmwJp7E5eXdn"
  },
}
1. Retrieving a cart && updating your Vuex store
The first thing you'll want to do is revisit your Vuex store located at store/index.js and create an empty object in state named cart which is where all your data related to your cart will be.
Next, you will want to build out three more actions; addProductToCart: Adds a product to your cart, removeProductFromCart: Removes a product from the cart, emptyCart: Empties the cart.
After your actions are complete, you will want to update the nuxtServerInit() action to dispatch getProducts and commit mutations to update the state with the returned data products.list()).
After you finish that up, create your mutations which will be, setProducts: Sets your products in state, setCart: Called by multiple actions to set the cart object in state, and then clearCart: which will clear your cart object and set it back to it's default value({}). And lastly, you'll want to create the following getters to easily retrieve your state from any component. A cart getter to retrieve your cart data, and one final getter for the subtotal property from the cart object called cartSubtotal.
// store/index.js

// State
export const state = {
  products: [],
  cart: {}
}

// Actions
export const actions = {
  async nuxtServerInit({ dispatch }) {
    await dispatch('getProducts')
  },

  async getProducts({ commit }) {
    const products = await Vue.prototype.$commerce.products.list()

    if (products) {
      commit('setProducts', products.data)
    }
  },

  async retrieveCart({ commit }) {
    const cart = await Vue.prototype.$commerce.cart.retrieve()

    if (cart) {
      commit('setCart', cart)
    }
  },

  async addProductToCart({ commit }, id, count) {
    const addProduct = await Vue.prototype.$commerce.cart.add(id, count)

    if (addProduct) {
      commit('setCart', addProduct.cart)
    }
  },

  async removeProductFromCart({ commit }, payload) {
    const removeProduct = await Vue.prototype.$commerce.cart.remove(payload)

    if (removeProduct) {
      commit('setCart', removeProduct.cart)
    }
  },

  async clearCart({ commit }) {
    const clear = await Vue.prototype.$commerce.cart.empty()

    if (clear) {
      commit('clearCart')
    }
  }
}

// Mutations
export const mutations = {
  setProducts(state, payload) {
    state.products = payload
  },

  setCart(state, payload) {
    state.cart = payload
  },

  clearCart(state) {
    state.cart = {}
  }
}

// Getters
export const getters = {
  products(state) {
    return state.products
  },

  cart(state) {
    return state.cart
  },

  cartSubtotal(state) {
    if (state.cart.subtotal) {
      return state.cart.subtotal.formatted
    }
  }
}
2. Update CommerceItem.vue
In this next step, you will be updating your CommerceItem.vue component from the previous guide to use the addProductToCart(Add To Cart Response) action in combination with a component method to allow the specified item to be added to a cart. To do that you will first import Vuex's ...mapActions to map your store's actions, making them available in your component without having to call this.$store.dispatch(). Add the methods property to your component in your default export. Inside of your methods you will call ...mapActions and put the action that you want to dispatch inside, in this case that will be 'addProductToCart' and what it will be bound to in your component(addToCart). This will allow you to use @click="addToCart(product.id)" for the button event to add that product to your cart. To further understand how a Vuetify button works and all of it's available props, I recommended checking out Vuetify's v-btn Component.
// CommerceItem.vue
<template>
  <v-card>
    ...
    <v-btn
      block
      class="my-2 mx-1"
      color="green"
      large
      @click="addToCart(product.id, 1)"
     >
       <v-icon class="mr-2" small>mdi-lock</v-icon>
         Add To Cart
     </v-btn>
    ...
  </v-card
</template>

<script>
import { mapActions } from 'vuex'

export default {
  name: 'CommerceItem',
  props: {
    product: {
      type: Object,
      default: () => ({
        description: '',
        id: '',
        media: null,
        name: '',
        price: null,
        quantity: null
      })
    }
  },
  methods: {
    ...mapActions({
      addToCart: 'addProductToCart'
    }),
  }
}
</script>
3. Cart component
This next step you will be utilizing two of the actions you created earlier in order to build out a cart component and display cart data using Vuetify. First, create your Checkout.vue component file in the components/ directory. From there, you will get started with the <script></script> tag and build from there as the component's starting point. At the top import mapActions as you will need it for dispatching the actions required for this component. Inside of your export default, you should first start with the name property and make sure it matches the filename of the component. Following name, you will write out the props this component will be using. Start off with a cart prop which will just be an object type since that's the type it was given in your state. A value prop will be a boolean type and used for Vuetify's v-navigation-drawer, the base of this component. For your methods, use ...mapActions so you can map the removeProductFromCart action as removeProduct() and the clearCart action as clearCart() and retrieveCart as retrieveCart() inside of your Checkout component.
// components/Checkout.vue
<script>
import { mapActions } from 'vuex'

export default {
  name: 'Checkout',
  props: {
    cart: {
      type: Object,
      default: () => {}
    },
    value: {
      type: Boolean,
      default: false
    }
  },
  methods: {
    ...mapActions({
      retrieveCart: 'retrieveCart',
      removeProduct: 'removeProductFromCart',
      clearCart: 'clearCart'
    })
  }
}
</script>
Retrieving the cart is handled on the client-side so you'll need to add the retrieveCart action when the component mounts. In between the props and methods properties add the mounted hook and call the retrieve cart action:
mounted() {
  this.retrieveCart();
},
Here is the template that will be used inside of components/Checkout.vue, As you notice in <v-navigation-drawer> the value prop is bound to the navigation drawer's value, which determines it's open or closed state. There is also a v-chip component that emit's an event to it's parent when clicked called closeDrawer, which will being closing the navigation drawer. Inside of the v-for template there is a v-icon with a click event attached that calls the removeProduct(product.id) method and passes the id of the cart item to remove it. The last important component is the v-btn that calls the clearCart method when clicked and will entirely empty the cart. The rest of the template is up to you how you'd like to style it, as long as you keep in mind to utilize those methods and props. A full demonstrated Checkout component template is provided below.
* Note * The demo link provided at the beginning and end of this guide utilizes this template in the checkout component.
// components/Checkout.vue
<template>
  <v-navigation-drawer
    :value="value"
    fixed
    right
    stateless
    temporary
    width="500"
  >
    <v-row class="d-flex my-8">
      <v-icon class="ml-10 mr-2" color="#6C7C8F" dense>mdi-cart-outline</v-icon>
      <span class="nav-text title">Cart</span>

      <v-chip class="ml-auto mr-10" outlined @click.stop="$emit('closeDrawer')">
        Close Cart
      </v-chip>
    </v-row>
    <v-divider></v-divider>

    <v-list>
      <v-list-item
        v-if="!cart.line_items || cart.line_items.length <= 0"
        class="text-center mb-2"
      >
        <v-list-item-content>
          <span class="subtitle-1 font-weight-light nav-text">
            Cart is empty!
          </span>
        </v-list-item-content>
      </v-list-item>

      <template v-for="product in cart.line_items">
        <v-list-item :key="product.product_id" class="mb-2">
          <v-list-item-title>
            {{ product.name }}
          </v-list-item-title>

          <span class="mr-2">
            {{ product.quantity }}
          </span>
          <span class="mr-2">
            ${{ product.line_total.formatted || '0.00' }}
          </span>
          <v-icon @click.stop="removeProduct(product.id)">mdi-cancel</v-icon>
        </v-list-item>
      </template>

      <v-divider></v-divider>

      <v-list-item class="mt-2 mb-2">
        <v-list-item-title>
          <span class="nav-text subtitle-1 font-weight-medium">Subtotal</span>
        </v-list-item-title>

        <span v-if="cart.subtotal" class="mr-1 nav-text">
          ${{ cart.subtotal.formatted }}
        </span>
        <span v-else class="mr-1 nav-text">${{ subtotal }}</span>
        <v-chip class="text-center" color="green" label outlined small
          >USD</v-chip
        >

        <v-btn class="ml-3" color="red" label outlined small @click="clearCart">
          Clear
        </v-btn>
      </v-list-item>

      <v-divider></v-divider>

      <v-list-item class="justify-center">
        <v-btn
          color="green"
          class="white--text mt-10"
          :disabled="disabled"
          x-large
        >
          <v-icon small>mdi-lock</v-icon>
          <span>Secure Checkout</span>
        </v-btn>
      </v-list-item>
    </v-list>
  </v-navigation-drawer>
</template>
4. Importing and using Checkout.vue
Since you just created a Checkout.vue component, it is time to use it in your application. To do that go to your pages/index.vue and add the component to your import's like so: import Checkout from '~/components/Checkout, be sure to add Checkout to your index.vue's components property to correctly register the component. While you are doing imports, it would also be a good time to import the mapGetters function to map and access your store's getters that were created earlier in this guide. Another addition to this file, will be the data object which will contain a boolean named drawer that will dictate the state of the Checkout.vue drawer. The last bit for the script tag is to add the computed property and utilize ...mapGetters to map your product, cart, and cartSubtotal getters that you created earlier as computed properties.
Now that your components script tag is updated, add the <checkout /> component element to the template and be sure to set the v-model attribute to the drawer data property and add a @closeDrawer listener that sets drawer to the opposite of it's current boolean value when closeDrawer is emitted from the button you created in the previous section for Checkout.vue. The last step for this page component will be to create a button that will activate your Checkout drawer when clicked. For this create a <v-btn> and add a @click event that will set drawer in the data object to it's opposite value.
// pages/index.vue
<template>
  <v-layout column justify-center align-center>
    <v-flex xs12 sm8 md6>
      <v-row class="d-flex justify-end">
        <v-btn fixed right @click.stop="drawer = !drawer">
          <v-icon class="mr-4">mdi-cart-outline</v-icon>
          <span class="mx-2">items</span>
          <span v-if="subtotal" class="mx-2">${{ subtotal }}</span>
          <span v-else class="mx-2">$0.00</span>
        </v-btn>
      </v-row>

      <v-col class="text-center ma-5">
        <span class="display-1">Demo Merchant</span>
      </v-col>

      <v-row>
        <template v-for="product in products">
          <v-col :key="product.id" class="mt-5">
            <commerce-item :key="product.id" :product="product" />
          </v-col>
        </template>
      </v-row>
    </v-flex>

    <checkout v-model="drawer" :cart="cart" @closeDrawer="drawer = !drawer" />
  </v-layout>
</template>

<script>
import { mapGetters } from 'vuex'
import Checkout from '~/components/Checkout'
import CommerceItem from '~/components/CommerceItem'

export default {
  components: {
    Checkout,
    CommerceItem
  },
  data: () => ({
    drawer: false
  }),
  computed: {
    ...mapGetters({
      products: 'products',
      cart: 'cart',
      subtotal: 'cartSubtotal'
    })
  }
}
</script>
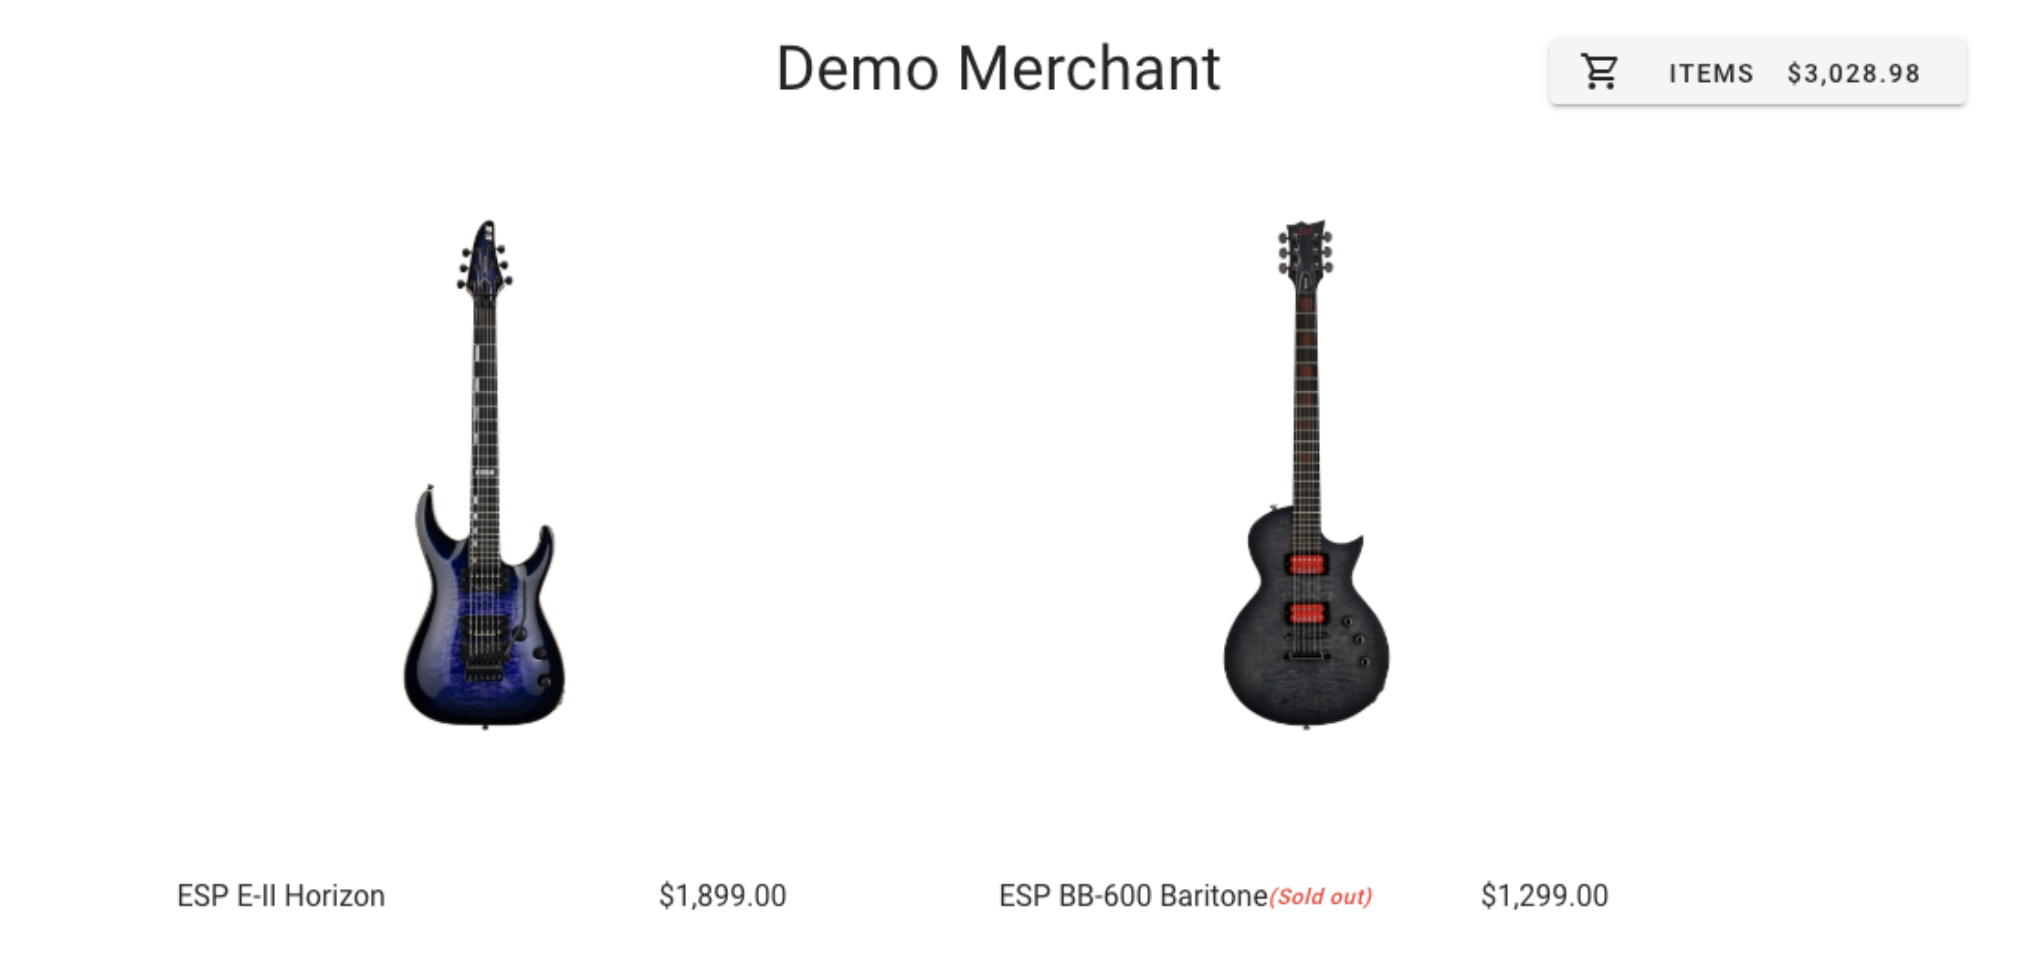
With the previous steps put together you should have something pretty close to this:

5. Run your app!
You should now be able to run your Nuxt application and start adding items to your cart.
// yarn
yarn dev

//npm
npm run dev
Conclusion
Nice work, you've successfully added and removed products from a cart, cleared a cart, and created a nice Checkout drawer component to display cart data.
Let's review what we have accommplished in this guide.
- Learned how to add product variants in your Chec dashboard.
- Expanded your Vuex store to include adding and removing a product from the cart, emptying your cart, and retrieving cart data server-side.
- Created a navigation drawer Checkout component to display cart data and manipulate the cart's items.
- Listed cart items in your Checkout component with the subtotal.
As you can see, the Commerce.js SDK makes managing a cart pretty easy, the only thing left for you to do is style the layout how you see fit.