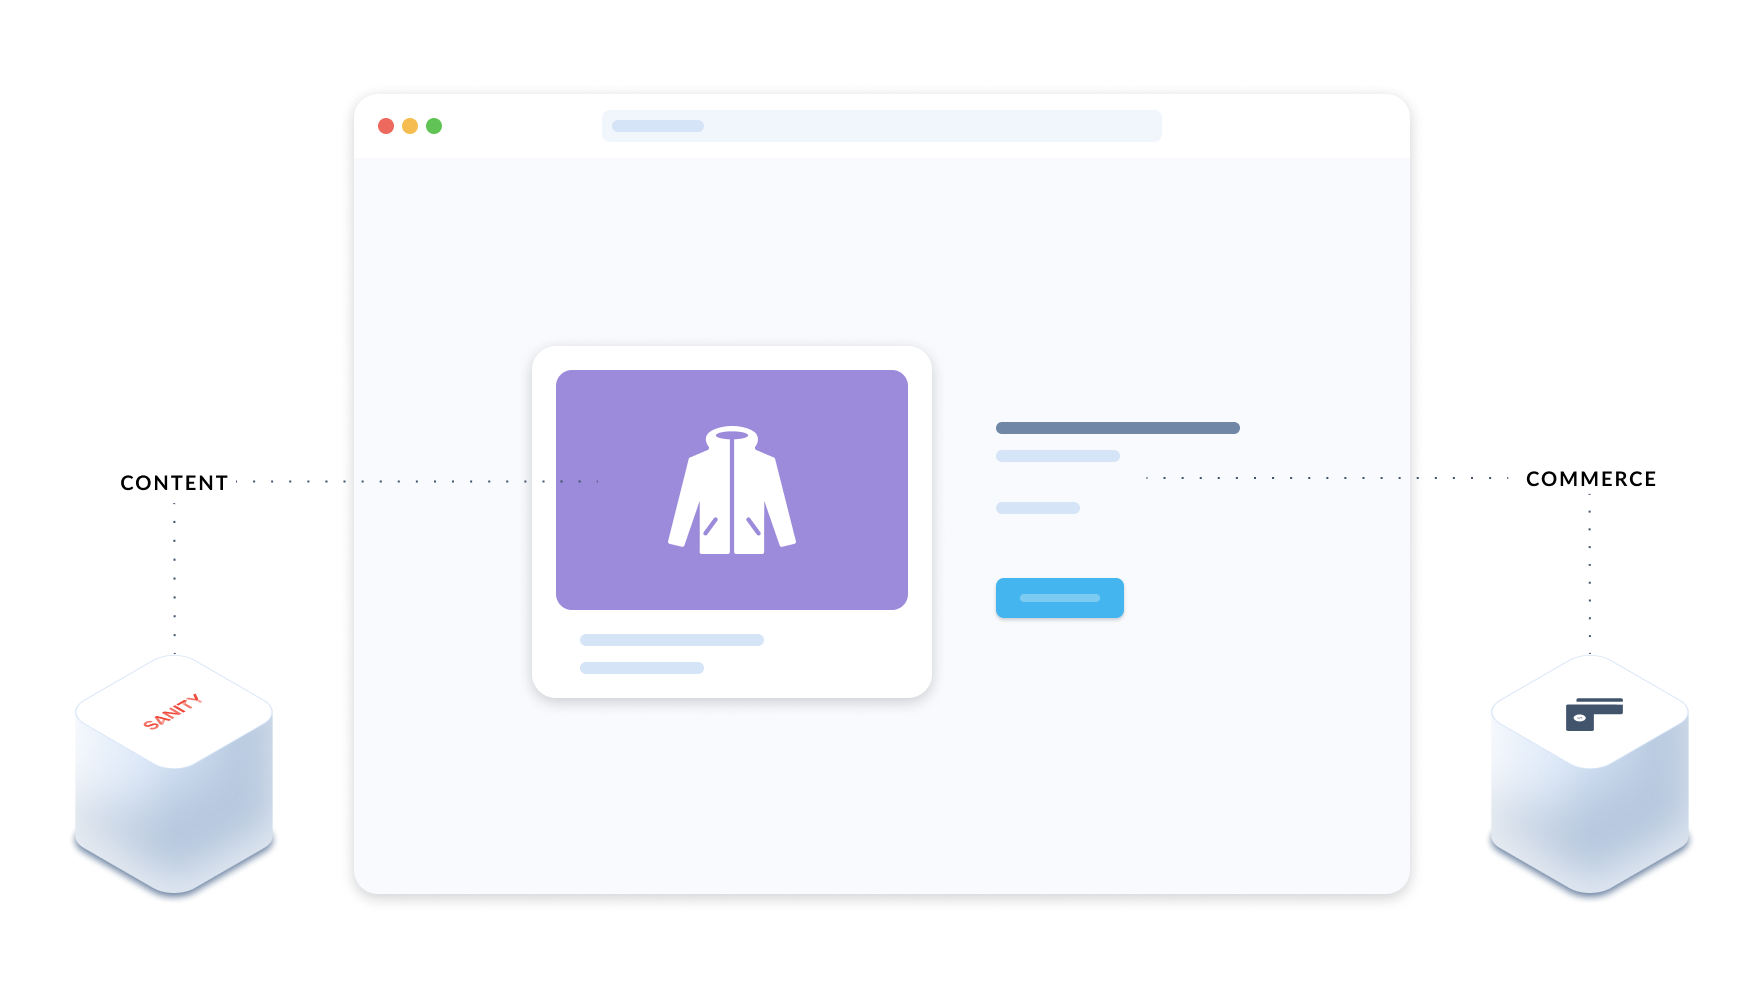
A headless CMS paired with headless eCommerce is a perfect match for marketing and content teams. The headless commerce provider manages the product, cart, and checkout logic, with the content provider managing assets, data, and copy for the rest of the site.
In this post I’ll show you how to connect your products from Commerce.js to your Sanity CMS. Doing this will allow content admins to add products into any page, blog, or app without leaving the Sanity CMS.
This post was inspired by the article how to make a custom input component. Following Thomas’ instructions, you’ll be able to create all sorts of input fields, and perhaps publish them later on npm and/or the Sanity plugin page.
Why this makes sense
Decoupling your commerce and content allows you to customize your marketing site and shop any way you like: custom landing pages, custom page layouts, custom checkout journeys, custom data to be displayed etc. With a headless CMS and commerce powering your business site, your team will have greater flexibility and freedom when it comes to personalizing content.
Like Commerce.js, Sanity.io is a headless provider. Sanity makes it easy to customise structured content, tailor it for a given format, and display it on any front-end. This includes custom input fields and different kinds of pages templates.
The ability to select products from inside the Sanity CMS allows content teams to create targeted campaign pages that reference only certain products, publish new category pages for newly arrived products, and design a fancy slider section with featured products. Custom inputs can be created for all of these by linking your Commerce.js products and publishing content around those products.
In this post we'll only cover how to get Commerce.js products into Sanity through a custom input field. The rest of the creative process I'll leave to you.
Set up Sanity locally
To set up a new project:
npm i -g @sanity/cli
sanity init
When prompted, select “Blog schema”, and the rest could be defaults.
Now get in your project folder and start the local server on localhost:3333
cd <project-title>
yarn start
Create a schema
Let’s start from the end, and tell our post schema to display our field (that doesn’t exist yet). Go to schemas/post.js and insert our field inside the existing fields array:
fields: [
   …,
   {
     title: "Related products",
     name: "commercejsProducts",
     type: "commercejsProducts",
   },
 ]
We’ll call them “Related products”, because these could be the products that are related to the content in the blog post.
You may have noticed that we’ve used field type that doesn’t exist (see default field types). So we need to create it inside the separate schemas/commercejsProducts.js file.
import CommercejsProducts from "../components/CommercejsProducts";

export default {
 name: "commercejsProducts",
 title: "Commercejs Products",
 type: "array",
 of: [
   {
     type: "singleProduct",
     name: "singleProduct",
   },
 ],
 inputComponent: CommercejsProducts,
};
In this schema we will tell Sanity what component to use to display our data. Right now we’re importing a non-existent CommercejsProducts component from the components folder. We’ll get back to that later. But for now, we’re using the type singleProduct that also doesn’t exist.
We need to create a schema for every single one level deep Object, because Sanity GraphQL cannot read nested objects, unless they’re registered globally.So if we want to create more complex structures, ie objects that go multiple-levels in depth, then we need to create a schema for every object that we’d like to nest, give it a name and only then use that in an object (like we did here). Now let’s create schemas/singleProduct.js schema now.
export default {
 name: "singleProduct",
 type: "object",
 fields: [
   {
     name: "id",
     type: "string",
   },
   {
     name: "created",
     type: "number",
   },
   {
     name: "last_updated",
     type: "number",
   },
   {
     name: "active",
     type: "boolean",
   },
   {
     name: "permalink",
     type: "string",
   },
   {
     name: "name",
     type: "string",
   },
   {
     name: "description",
     type: "string",
   },
   {
     name: "price",
     type: "price",
   },
   {
     name: "quantity",
     type: "number",
   },
 ],
};
Technically, we can put all that inside our schemas/commercejsProducts.js schema, nest it, and we’ll be able to even see that working on localhost. But when you’ll try to deploy that to GraphQL, it will give you an error that would look like this:
Error: Encountered anonymous inline object "singleProduct" for field/type "commercejsProducts". To use this field with GraphQL you will need to create a top-level schema type for it. See https://docs.sanity.io/help/schema-lift-anonymous-object-type
So if we have a property in our Commerce.js product that is another object, we’ll create a separate schema for it, give it a name and reference it in the parent object. Like for the price we’ll have this:
export default {
 name: "price",
 type: "object",
 fields: [
   {
     name: "raw",
     type: "number",
   },
   {
     name: "formatted",
     type: "string",
   },
   {
     name: "formatted_with_symbol",
     type: "string",
   },
   {
     name: "formatted_with_code",
     type: "string",
   },
 ],
};
So go through the product object, see what properties you need and create schemas for them. In the end, we’ll need to import our custom schemas in schemas/schema.js file and register them with the createSchema function:
First, we must import the schema creator
import createSchema from "part:@sanity/base/schema-creator";
import schemaTypes from "all:part:@sanity/base/schema-type";

import commercejsProducts from "./commercejsProducts";
import singleProduct from "./singleProduct";
import price from "./price";

export default createSchema({
 …,
 types: schemaTypes.concat([
   …,
   // Commerce.js product schemas
   commercejsProducts,
   singleProduct,
   price,
 ]),
});
Schemas are now ready! 👏
Create the input component
Now go to your components folder and open your CommercejsProducts.jscomponent that we left hanging while doing schemas.
Let’s make a dummy component and see how it looks.
import React from "react";
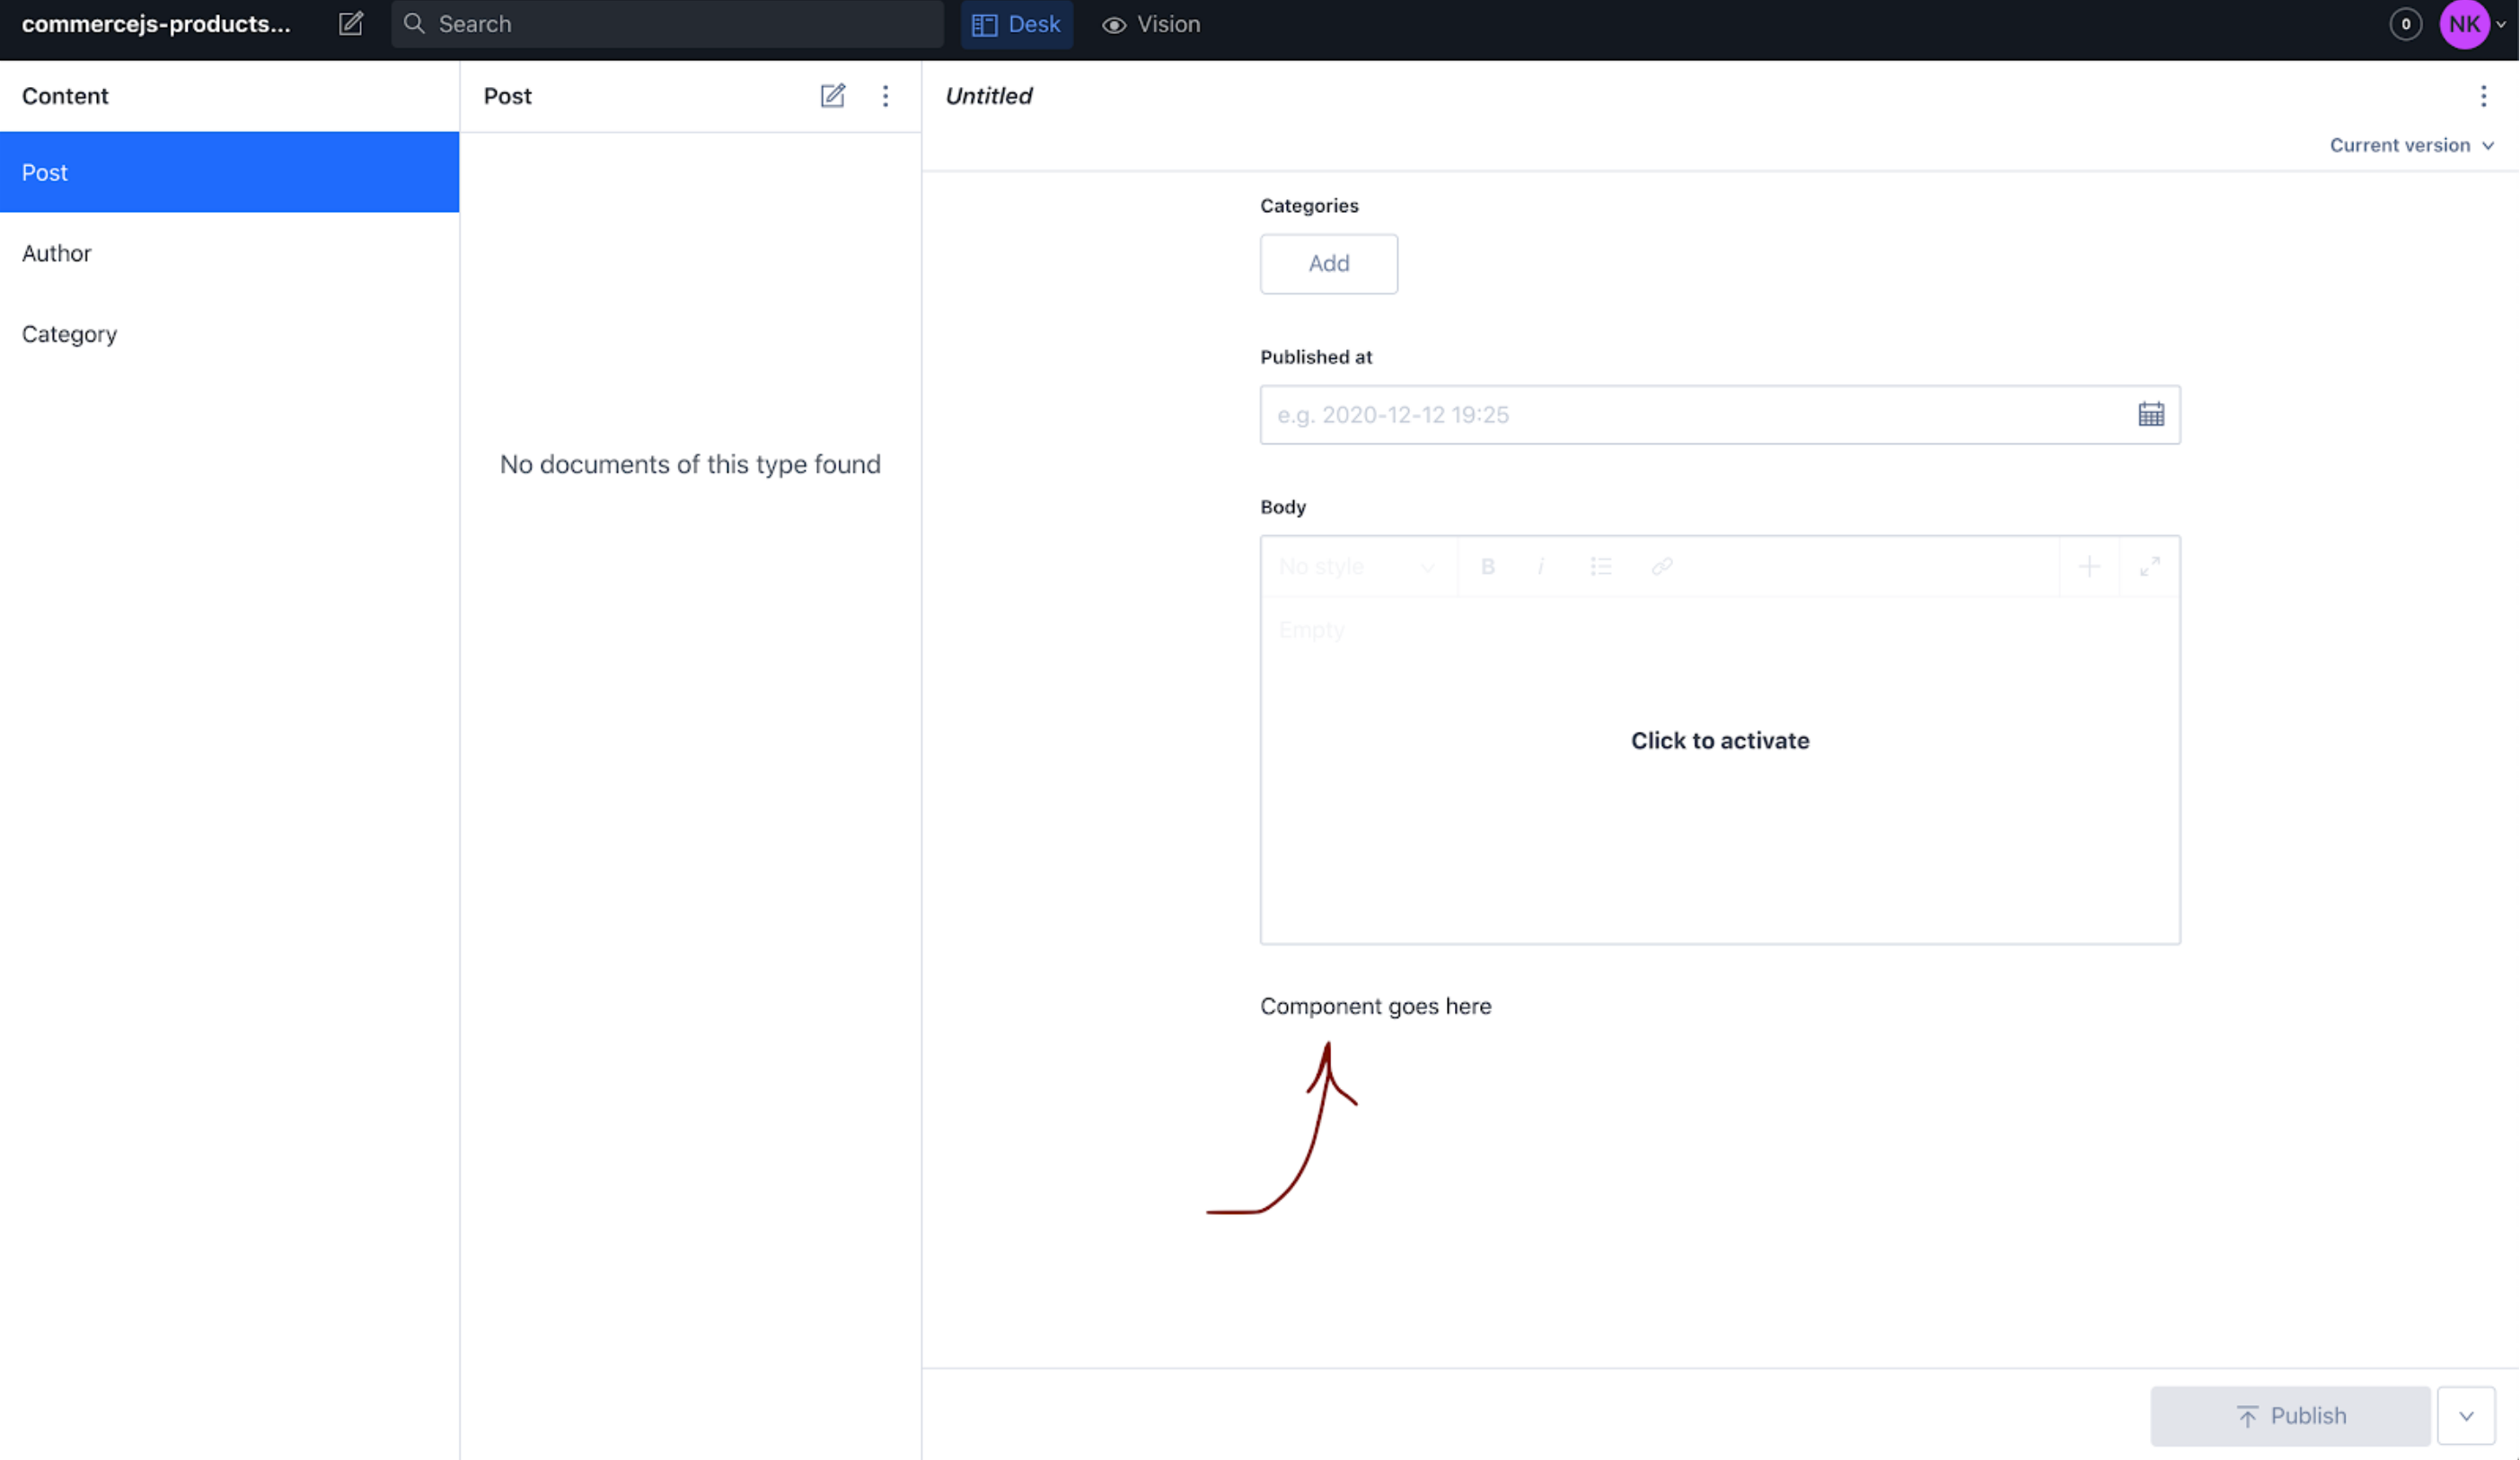
const CommercejsProducts = () => <div>Component goes here</div>;
export default CommercejsProducts;
And Voila! You can see our component at the bottom of all other fields in the Post type page.
Now let’s make it look like a Sanity field with the Fieldset component. We’re importing it from Sanity parts. You can read more about parts from the Sanity blog.
In addition to making it look like a Sanity field, let’s make it behave like a Sanity field. Let’s save some of our data that we receive from Commerce.js to Sanity by firing an onChange event onMount of our component. We’ll take the onChange event from PatchEvent. PatchEvent helps us synchronise all the events that are happening in Sanity across different browsers/users. So that means two users can be editing the same field of the same post and they’ll be aware of the changes.
So let’s install our Commerce.js SDK and make that happen:
yarn add @chec/commerce.js
import React, { useEffect } from "react";
import Fieldset from "part:@sanity/components/fieldsets/default";
import PatchEvent, { set, unset } from "part:@sanity/form-builder/patch-event";
import Commerce from "@chec/commerce.js";

const commerce = new Commerce(
 "pk_184625ed86f36703d7d233bcf6d519a4f9398f20048ec",
 true
);

const createPatchFrom = (value) =>
 PatchEvent.from(value === "" ? unset() : set(value));

const CommercejsProducts = ({ type, value, markers, level, onChange }) => {
 useEffect(() => {
   commerce.products
     .list()
     .then((res) => {
       console.log([{ id: res.data[0].id }, { id: res.data[1].id }]);
       onChange(createPatchFrom([res.data[0], res.data[1]]));
     })
     .catch((error) => {
       console.log("There was an error fetching the products", error);
     });
 }, []);
 const { title, description } = type;
 return (
   <Fieldset
     legend={title}
     description={description}
     markers={markers}
     level={level}
   >
     {JSON.stringify(value)}
   </Fieldset>
 );
};

export default CommercejsProducts;
If you open the changes sidebar, you’ll notice that onMount fired onChange event and we had unsaved changes to our blog post data.
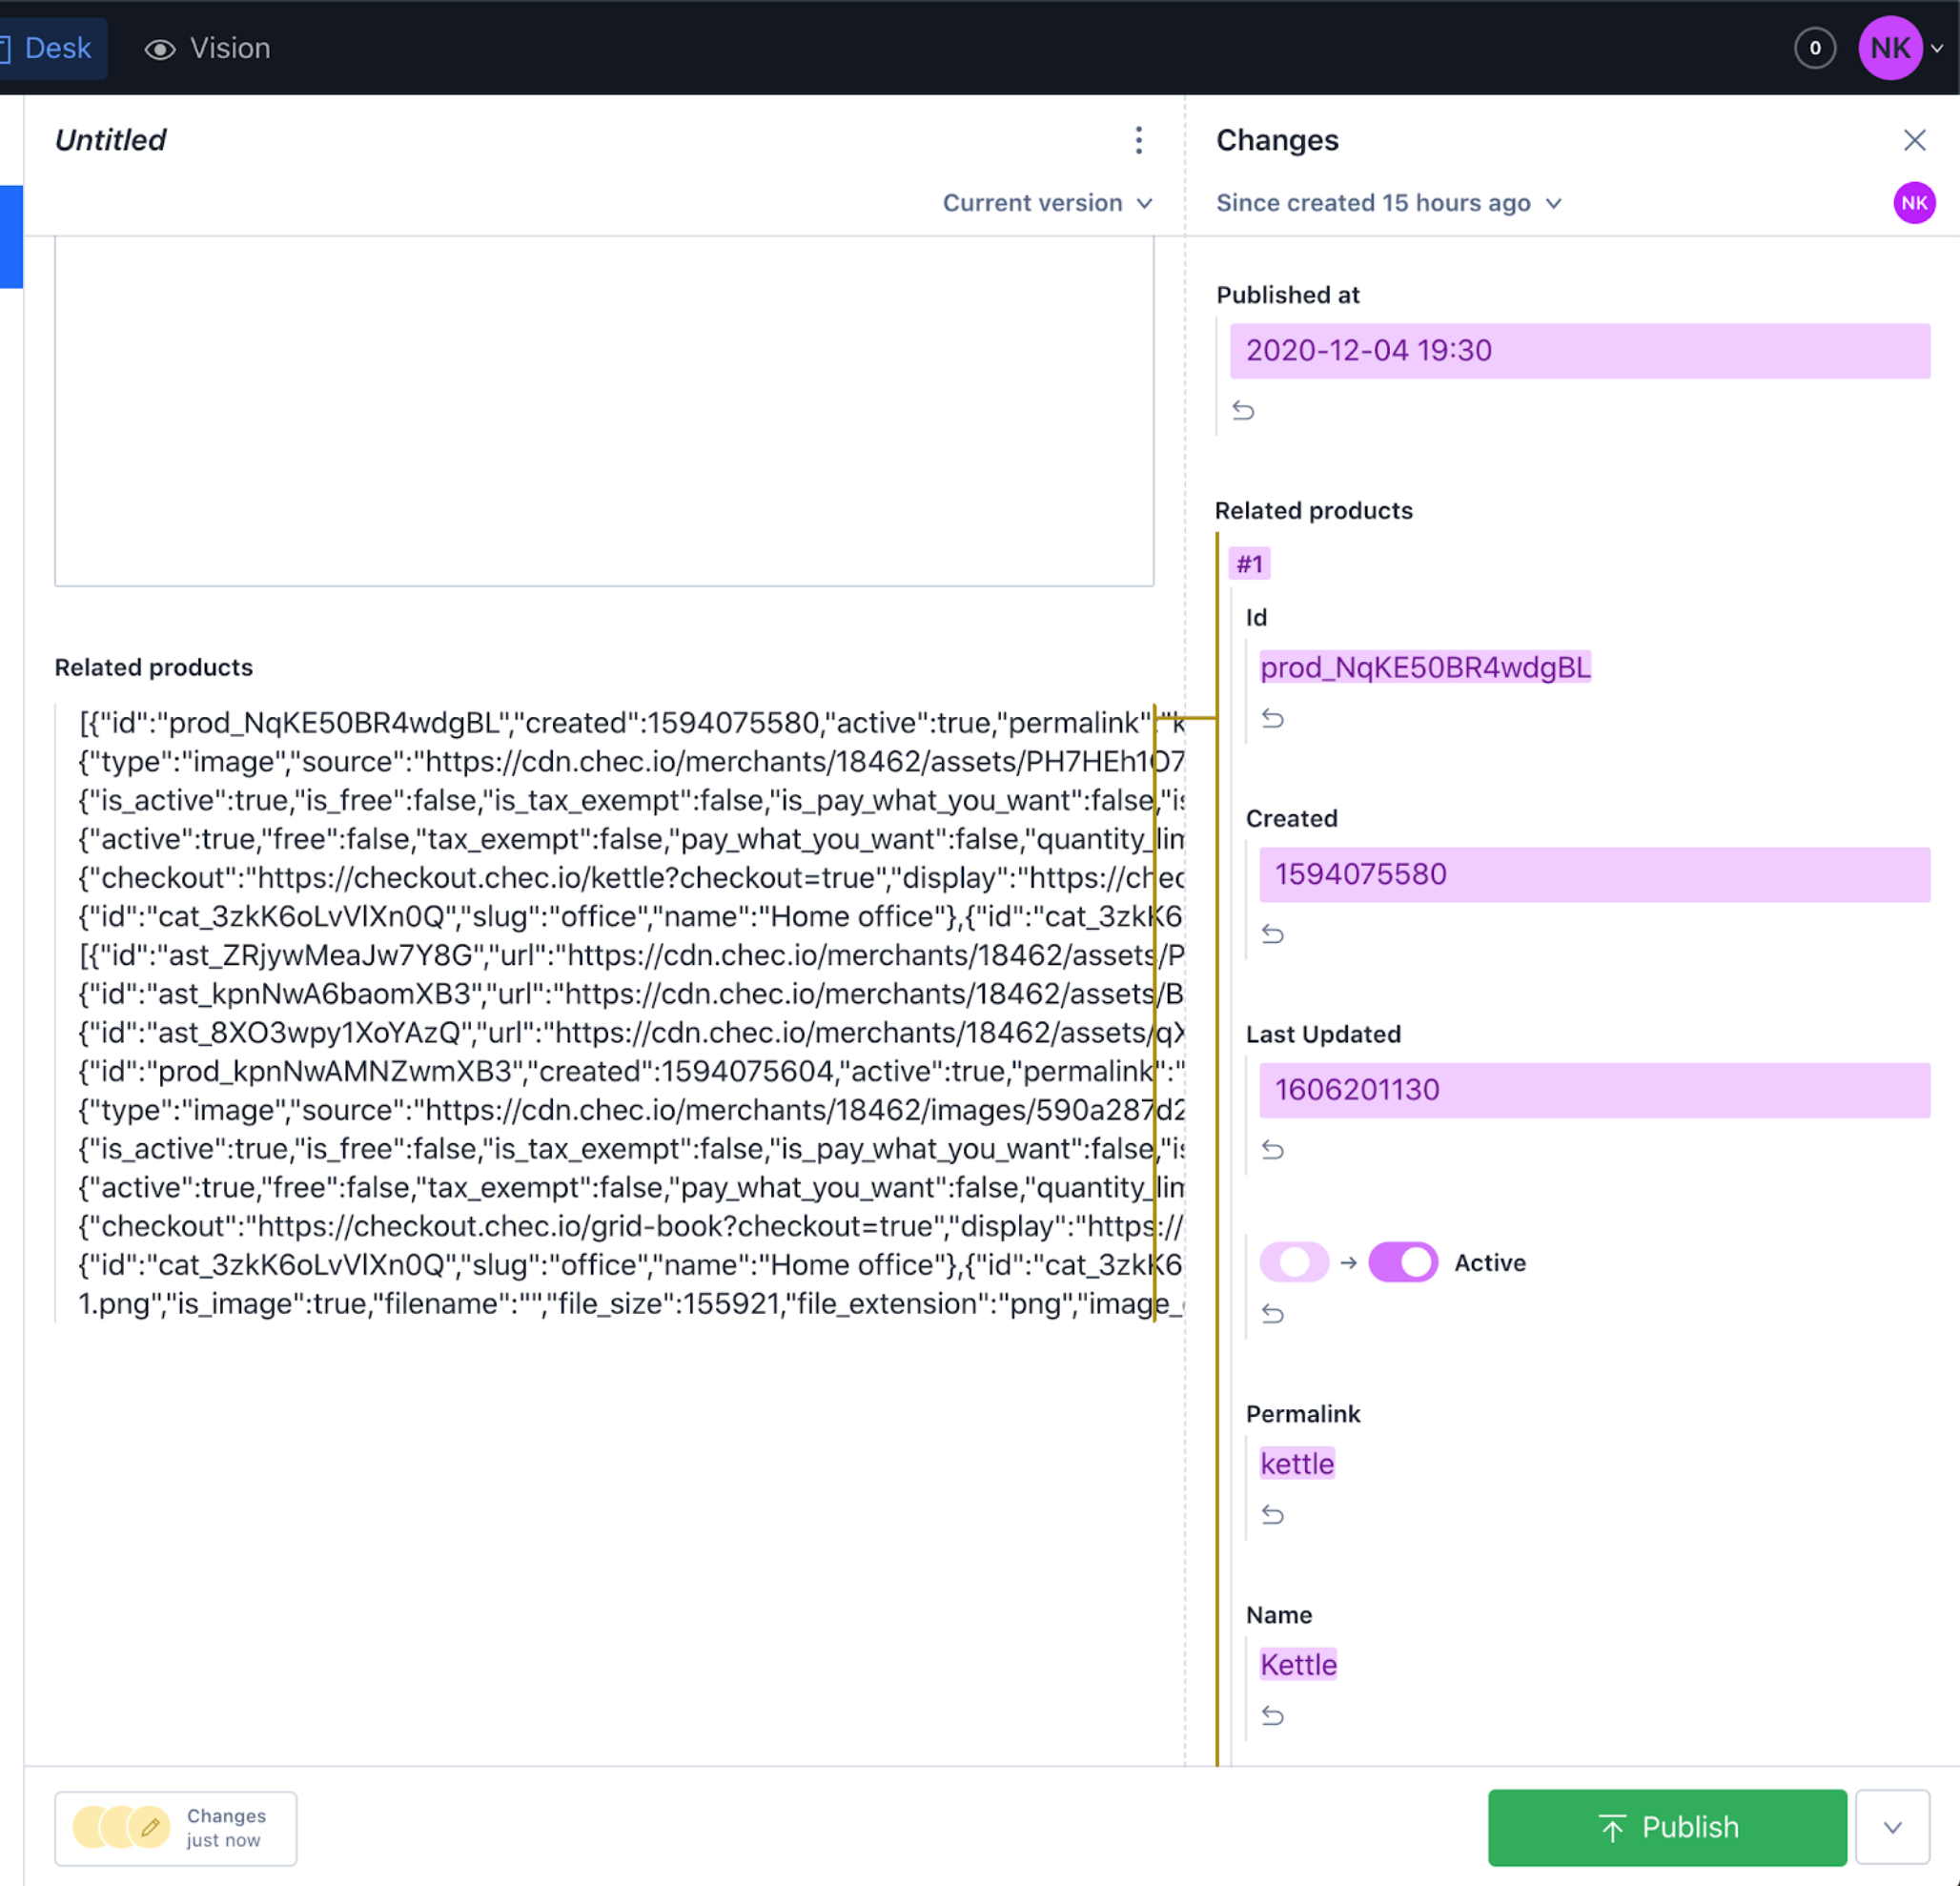
Click “Publish” and let’s see that from the GraphQL end, shall we?
Run sanity graphql deploy to deploy your GraphQL. You’ll be asked if you’d like to deploy it, say ‘Y’.
That command will give us a URL where we can view the GraphQL schema, something like:
https://<sanity_id>.api.sanity.io/v1/graphql/production/default
Go to that URL and query posts with our products using the following query:
query {
  allPost {
    commercejsProducts {
      id
      name
      description
      quantity
      price {
        raw
      }
    }
  }
}
And you should see this data returned:
{
  "data": {
    "allPost": [
      {
        "commercejsProducts": [
          {
            "id": "prod_NqKE50BR4wdgBL",
            "name": "Kettle",
            "description": "<p>Black stove-top kettle</p>",
            "quantity": 0,
            "price": {
              "raw": 45.5
            }
          },
          {
            "id": "prod_kpnNwAMNZwmXB3",
            "name": "Book",
            "description": "<p>Book on grid systems</p>",
            "quantity": 0,
            "price": {
              "raw": 13.5
            }
          }
        ]
      }
    ]
  }
}
So now we’re getting the right data, let’s make it work with an input field so our content admins/managers can actually search and select the products they want 😁.
Create input field
We want to create a nice user experience, so let’s use async react-select field
yarn add react-select
import React from "react";
import Fieldset from "part:@sanity/components/fieldsets/default";
import PatchEvent, { set, unset } from "part:@sanity/form-builder/patch-event";
import Commerce from "@chec/commerce.js";
import AsyncSelect from "react-select/async";
import debounce from "lodash.debounce";

const commerce = new Commerce(
 "pk_184625ed86f36703d7d233bcf6d519a4f9398f20048ec",
 true
);

const createPatchFrom = (value) =>
 PatchEvent.from(value === "" ? unset() : set(value));

const CommercejsProducts = ({ type, value, markers, level, onChange }) => {
 const { title, description } = type;

 const loadOptions = debounce(async (inputValue, callback) => {
   const { data } = inputValue
     ? await commerce.products.list({ query: inputValue })
     : await commerce.products.list();

   const products = data.map((product) => ({
     ...product,
     label: product.name,
     value: product.id,
   }));

   callback(products);
 }, 500);

 const handleChange = (values) => {
   onChange(createPatchFrom(values));
 };

 return (
   <Fieldset
     legend={title}
     description={description}
     markers={markers}
     level={level}
   >
     <AsyncSelect
       value={value}
       cacheOptions
       isMulti
       defaultOptions
       loadOptions={loadOptions}
       onChange={handleChange}
     />
   </Fieldset>
 );
};

export default CommercejsProducts;
A few things are happening here.
- Since all inputs are controlled in Sanity, we need to pass default value to our select component as a prop.
createPatchFromfunction that handles theonChangeevent, that we have in thehandleChangefunction. It fires when we select the item from the suggested list.AsyncSelectcomponent acceptsloadOptionsthat we need to put intodebounceso that we don’t send HTTP requests immediately on every keystroke.- The
loadOptionshas Commerce.js SDK package that is initialized at the top of our component, that gets the list of products, and depending whether this function is called byonMountoronChange, we’re displaying either full list of products or products that the user searched for. - Inside the
loadOptionsfunction we need to loop through the elements and createlabelandvalueproperties, because ourreact-selectcomponent is looking for them. Don’t worry about it being passed higher, and it being found in GraphQL search, because Sanity takes out all the fields that are not declared in the schema.
NOTE: DO NOT store your Commerce.js public key in your project, this is done solely for demonstration purposes. Keep your secret in .env variables.
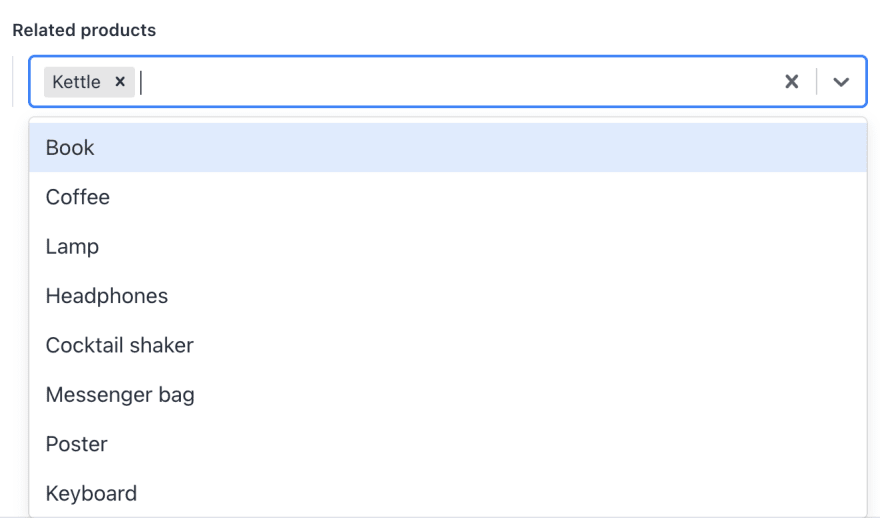
And there we go, we have a multi select input component that allows us to link Commerce.js products to our blog post.

Next steps
This is a very simple component that lists some of the properties from a Commerce.js product, you can enhance it any way you’d like, for example you can:
- Add more (or less) properties for your products;
- Change the dropdown input to a grid format with images, to make it easier for your content/marketing team to navigate through your products.
You can also create another input field that lists categories, if you want those. Commerce.js has an API for it as well.
If then you’d like to publish your sanity-commercejs-input component(s) to npm, have a look at Espen’s and Knut’s stream, Espen goes through some instructions and tips starting from 1:05:49.
You should now be able to see the power of using headless content with headless commerce. Integrating the two empowers content editors when it comes to creating and updating eCommerce related content.